When I started to use containers my first contact was with the OpenShift Red Hat Solution and I really like its triggers functionality where automatically redeploys a container when its image changes.
I was a little bit disappointed when I realized that AWS doesn’t provide something similar out of the box, but the good news is that we can create this useful feature by ourselves.
First of all, let me show you in this AWS Diagram what we are going to build:
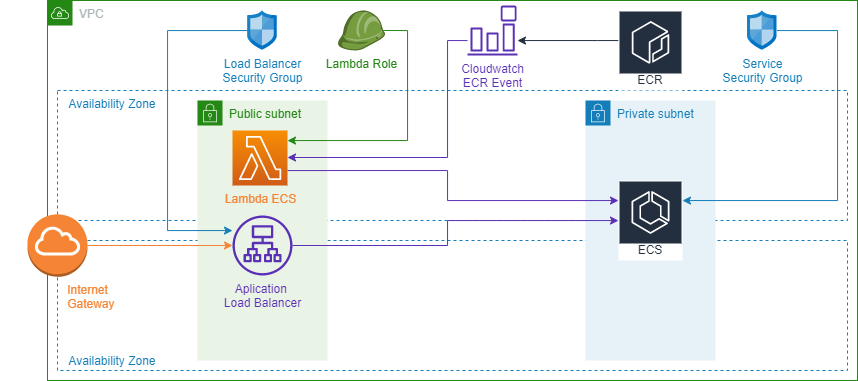
In this project, we are going to deploy a Microservice inside a Fargate container using ECS (Elastic Container Service) and we will create an ALB (Application Load Balancer) to be able to reach our Microservice.
The workflow works as follows, we’ll introduce a change in our Microservice and we’ll push this change to ECR (Elastic Container Repository), this action will trigger a Cloudwatch Event that will invoke a Lambda function that will start a new Fargate task.
“Fargate is a serverless compute engine for containers that removes the need to provision and manage servers”
AWS
Requirements
This project requires a little bit of preparation and installing some software that you need to have on your computer. So, to follow this lab I recommend you download all the resources from my GitHub.
One of the basic things that you might need is a VPC with public and private subnets in two different Availability Zones (AZs) and a Nat Gateway running. If you don’t have one yet I recommend you have a look at my post Create a VPC with Nat Gateway.
First, we have to create an ECR Repository where we will push our docker image. We have two options to create one, we can use the AWS Console selecting the option Service at the top bar menu and typing ECR in the search field.
Hit the button Create Repository and in the popup define your repository name (you can keep both Tag immutability and Scan on push fields disabled).
The other option is using the AWS CLI using the following command:
aws ecr create-repository --repository-name [repository-name]The repository name will be use later as a parameter in the Cloudformation stack
To create our Microservice fat-jar and put it in a container we need to download and install Maven and Docker. Maven is a project management tool that controls the life cycle of our project and Docker is a container engine that allows us to run containers on top of any operating system.
Probably you should configure the path to your [maven-directory]/bin in your path environment variable to execute the maven command from any folder
Once we have Maven and Docker installed and configured, we go into the hellocloud folder from the resources. This folder contains an example of Microservice using Java and Springboot that we will deploy inside the ECS Cluster using Fargate.
But before to do that, we need to package our Microservice into a fat-jar using the following Maven command
mvn packageIf the build finish successfully you should see a message like this in your console.
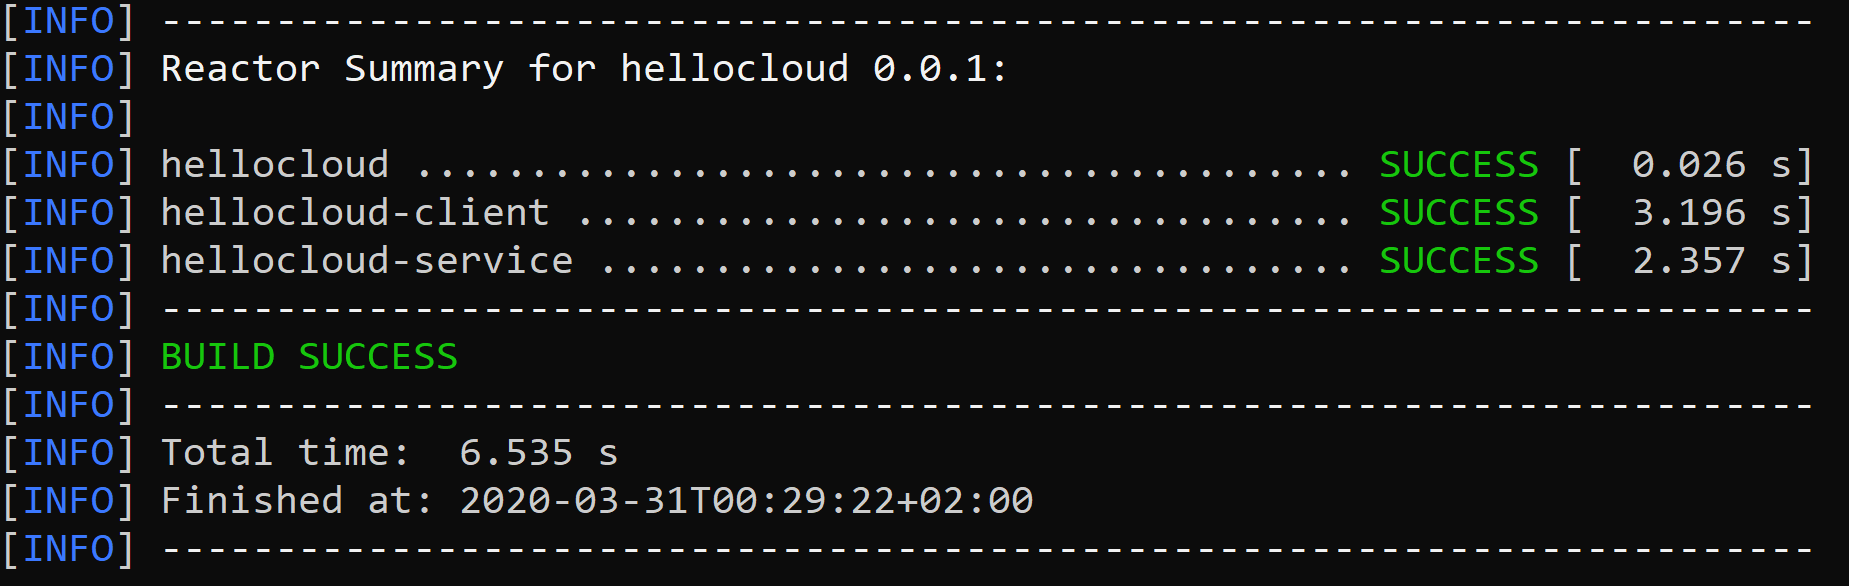
Then, you should find the file hellocloud.jar inside the hellocloud-service/target folder. But if you see any error message during the build, please leave me a comment with the error and I’ll have a look.
Once we have our fat-jar built, the next step is to dockerize our package and push it to ECR.
To dockerize our Microservice we’ve configured a Dockerfile in our project with the following content:
FROM openjdk:8-jre-alpine
LABEL service="hellocloud"
LABEL owner="godof.cloud"

VOLUME /data
ADD hellocloud-service/target/hellocloud.jar /data/hellocloud.jar

EXPOSE 8080

WORKDIR /data
ENTRYPOINT ["java","-jar", "hellocloud.jar"]
Here we define our container using several attributes:
- FROM: Define the base image for our Microservice, I’ve chosen the Java8 JRE alpine image.
- LABEL: Provides some metadata about our container.
- VOLUME: Creates a directory in our container.
- ADD: Copy a file into our container, in our case we copy the jar that we’ve generated into the /data directory.
- EXPOSE: Defines the port where our Microservice will be available, for us is 8080.
- WORKDIR: We set the data folder as our working directory.
- ENTRYPOINT: Executes the command that will run our Microservice.
To push this container you can find in the resources the script push-image2ecr that does the job for you.
The script comes in two flavors shell (Linux) and batch (Windows)
Let’s have a look at the shell script, but both do the same thing:
#!/bin/bash

echo Introduce aws profile [default]:
read profile

echo Introduce your ECR repository [xxxxxxxxxxxx.dkr.ecr.us-east-1.amazonaws.com/hellocloud]:
read repository

sudo docker build -t hellocloud ./hellocloud
docker tag hellocloud $repository

$(aws --profile $profile ecr get-login --no-include-email)

docker push $repository
In the first lines, I ask for the profile that you want to use to execute the AWS CLI commands, this profile usually is created the first time you configure the AWS CLI, but If you haven’t specified any the profile then the configuration will be set in the profile default. But, if you are not sure of your profile name, feel free to check the config file in the .aws folder located in your user folder (for windows usually is C:\Users\[user]\.aws and for Linux /home/[user]/.aws)
The second parameter that we would need is the ECR repository that you should have created to push our image, this repository name has the format [account].dkr.ecs.[region].amazonaws.com/[repository-name], you can find this name in the AWS Console if you click in Services → ECR → Repositories
The next two commands create the docker image using the Dockerfile that we defined before and tag that image using the AWS Repository name and finally, execute the AWS CLI command to log in into the ECR Repository and push the image to AWS.
Click in the repository name to check if the image has been uploaded successfully, if it’s there then we are ready to start building all the AWS infrastructure that we need to deploy automatically a new container when we upload a new image.
Parameters
As usual, we define some parameters that our Cloudformation template needs to know to configure the resources.
vpcId:
  Type: AWS::EC2::VPC::Id
  Description: 'VPC Id'
elbSubnetsId:
  Type: List<AWS::EC2::Subnet::Id>
  Description: 'Subnets associated with the Load Balancer'
containerSubnetsId:
  Type: List<AWS::EC2::Subnet::Id>
  Description: 'Private Subnets associated with the container'
repositoryName:
  Type: String
  Description: 'ECR Repository Name that contains the image'
prefix:
  Type: String
  Description: 'Prefix for the resources to be unique'
Default: 'ecr-icd'- vpcId: Identifier that we would need to attach some resources to our VPC.
- elbSubnetsId: List of public subnets where the Load Balancer will be attached, at least we need two subnets each one in a different AZ (Availability Zone).
- containerSubnetsId: List of private subnets where we are going to configure our container, it is advisable at least to define two subnets, each on in a different AZ.
- repositoryName: Repository name, this value should match with the repository name that you have created before.
- prefix: Prefix that will be appended in the resource’s name to be sure that there is any conflict with other resources that you might have, by default is ecr-icd.
Resources
Log Group
ECSLogs:
    Type: AWS::Logs::LogGroup
    Properties:
      LogGroupName: !Join ['-', [!Ref prefix, 'container-logs' ]]
      RetentionInDays: 14
One of the first resources that we will create is a log group to store the logs generated by the container, we set a retention period of 14 days, after that the older logs will be deleted.
Security Groups
ALBSecurityGroup:
  Type: AWS::EC2::SecurityGroup
  Properties:
    GroupName:  !Join ['-', [!Ref prefix, 'sg-alb']]
    GroupDescription: Application Load Balancer security group
    VpcId: !Ref vpcId
    SecurityGroupIngress:
      - Description: Allow access to the ELB on port 80
        IpProtocol: tcp
        FromPort: '80'
        ToPort: '80'
        CidrIp: 0.0.0.0/0

ServiceSG:
  Type: AWS::EC2::SecurityGroup
  DependsOn: [ ALBSecurityGroup ]
  Properties:
    GroupName:  !Join ['-', [!Ref prefix, 'service-sg']]
    GroupDescription: Service Security Group to allow Load Balancer Access
    VpcId: !Ref vpcId
    SecurityGroupIngress:
      - Description: Allow access to the ELB on port 8080
        IpProtocol: tcp
        FromPort: '8080'
        ToPort: '8080'
        SourceSecurityGroupId: !Ref ALBSecurityGroup
Then, we need to create are a couple of Security Groups. The first will be attached to our Application Load Balancer and will grant access to the port 80 for all external access, that’s because we defined the CidrIP as 0.0.0.0/0.
In general, this is not a good practice, you should restrict the range of IP where your application can be accessible and in case of being a public application, you should use CloudFront on top and restrict all the traffic to your Load Balancer except if it comes from CloudFront, but in order to simplify the project, we will continue with this approach.
The second Security Group will be used by the ECS Service that we will create later and provides access to port 8080 for all the AWS resources that have the LoadBalancer Security Group attached, this will make possible that the Load Balancer can redirect traffic to our container.
As you can see both Security Groups are attached to our VPC using the parameter VpcId.
Application Load Balancer
ECSALB:
  Type: AWS::ElasticLoadBalancingV2::LoadBalancer
  Properties:
    Scheme: 'internet-facing'
    Name: !Join ['-', [!Ref prefix, 'alb-external' ]]
    Subnets: !Ref elbSubnetsId
    SecurityGroups:
      - !Ref ALBSecurityGroup

ALBTGEmpty:
  Type: AWS::ElasticLoadBalancingV2::TargetGroup
  DependsOn: [ ECSALB ]
  Properties:
    HealthCheckIntervalSeconds: 60
    HealthCheckPath: /
    HealthCheckProtocol: HTTP
    HealthCheckTimeoutSeconds: 10
    HealthyThresholdCount: 2
    Port: 80
    Protocol: HTTP
    UnhealthyThresholdCount: 5
    VpcId: !Ref vpcId
    Tags:
    - Key: Name
      Value: !Join ['-', [!Ref prefix, 'tg-empty' ]]

ALBListenerHTTP:
  Type: AWS::ElasticLoadBalancingV2::Listener
  DependsOn: [ ECSALB, ALBTGEmpty ]
  Properties:
    DefaultActions:
    - Type: forward
      TargetGroupArn: !Ref ALBTGEmpty
    LoadBalancerArn: !Ref ECSALB
    Port: '80'
    Protocol: HTTP
The Load Balancer will route all our requests to the right targets distributing the load between them. AWS provides two types of Application Load Balancers, internet-facing for those Load Balancers that need to be accessible externally and internal to route requests inside the VPC.
In this section, we create our Application Load Balancer as internet-facing setting the same value in the parameter Schema, we attach our Security Group to allow public access to the port 80 and we place the Load Balancer in the subnets defined by the elbSubnetsId parameter.
Also, we define an empty Target Group to route requests that do not match with any rule and a Listener that check the connections available.
ECS Cluster
ECSCluster:
  Type: AWS::ECS::Cluster

ECSTaskDefinitionRole:
  Type: AWS::IAM::Role
  Properties:
    RoleName: !Join ['-', [!Ref prefix, 'ecs-td-role' ]]
    AssumeRolePolicyDocument:
      Statement:
      - Effect: Allow
        Principal:
          Service: [ecs-tasks.amazonaws.com]
        Action: ['sts:AssumeRole']
    Path: /
    Policies:
    - PolicyName: !Join ['-', [!Ref prefix, 'ecs-td-policy' ]]
      PolicyDocument:
        Statement:
        - Effect: Allow
          Action:
            - ecr:GetAuthorizationToken
            - ecr:BatchCheckLayerAvailability
            - ecr:GetDownloadUrlForLayer
            - ecr:BatchGetImage
            - logs:CreateLogStream
            - logs:PutLogEvents
          Resource: '*'

HelloCloudTaskDefinition:
  Type: AWS::ECS::TaskDefinition
  DependsOn: [ ECSCluster ]
  Properties:
    RequiresCompatibilities:
      - "FARGATE"
    Cpu: 256
    Memory: 512
    Family: "hellocloud-td"
    NetworkMode: "awsvpc"
    ExecutionRoleArn: !Ref ECSTaskDefinitionRole
    ContainerDefinitions:
      - Name: "HelloCloud"
        Image: !Join ['', [!Ref AWS::AccountId, '.dkr.ecr.', !Ref AWS::Region, '.amazonaws.com/', !Ref repositoryName] ]
        PortMappings:
          - ContainerPort: 8080
        LogConfiguration:
          LogDriver: awslogs
          Options:
            awslogs-group: !Join ['-', [!Ref prefix, 'logs-containers' ]]
            awslogs-region: !Ref 'AWS::Region'
            awslogs-stream-prefix: 'container'
    Tags:
      - Key: "Name"
        Value: "HelloCloudTaskDefinition"
Now we create our ECS Cluster, as you can see is not very difficult, with the first two lines of this section is enough, but creating a cluster is not enough, we have to create our Task Definition.
In this Task Definition, we configure the container that will be created in our cluster. In ECS we can create tasks using EC2 Instances o Fargate, for this example we’ve chosen make our task only compatible with Fargate because it is managed by AWS, so we don’t have to worry about provision any server.
We can define our task compatible with EC2 and Fargate and decide which one use in the Service
We also configure the CPU and Memory that will be required by our container, the repository where it takes the image, the port exposed by the container and the log configuration.
Because our task needs to perform several actions like downloading the image from ECR or stream logs to CloudWatch, we have to create a role to give our task the necessary permissions.
Finally, you might be wondering about the Network Mode parameter. AWS offers different network configurations for our containers (none, bridge, host and awsvpc). Explain in detail these mode is not the purpose of this blog, but I will tell you that to use Fargate the only value allowed is awsvpc. If you want to know more about the characteristics of each mode, I invite you to have a look at the AWS documentation https://docs.aws.amazon.com/AWSCloudFormation/latest/UserGuide/aws-resource-ecs-taskdefinition.html#cfn-ecs-taskdefinition-networkmode.
ECS Service
HelloCloudALBTG:
  Type: AWS::ElasticLoadBalancingV2::TargetGroup
  DependsOn: [ ECSALB ]
  Properties:
    TargetType: 'ip'
    HealthCheckIntervalSeconds: 10
    HealthCheckPath: '/hellocloud/actuator/health'
    HealthCheckProtocol: HTTP
    HealthCheckTimeoutSeconds: 5
    HealthyThresholdCount: 2
    Name: 'tg-hellocloud'
    Port: 8080
    Protocol: HTTP
    UnhealthyThresholdCount: 5
    VpcId: !Ref 'vpcId'
    Tags:
    - Key: Name
      Value: 'alb-tg-hellocloud'

HelloCloudALBListenerRule:
  Type: AWS::ElasticLoadBalancingV2::ListenerRule
  DependsOn: [ ECSALB, ALBListenerHTTP, HelloCloudALBTG ]
  Properties:
    Actions:
    - Type: forward
      TargetGroupArn: !Ref HelloCloudALBTG
    Conditions:
    - Field: path-pattern
      Values:
        - '/hellocloud/*'
    ListenerArn: !Ref ALBListenerHTTP
    Priority: 1

HelloCloudService:
  Type: AWS::ECS::Service
  DependsOn: [ ECSCluster, ECSALB, HelloCloudALBTG, HelloCloudALBListenerRule ]
  Properties:
    ServiceName: !Join ['-', [!Ref repositoryName, 'service' ]]
    Cluster: !Ref ECSCluster
    DesiredCount: 1
    LaunchType: FARGATE
    TaskDefinition: !Ref HelloCloudTaskDefinition
    HealthCheckGracePeriodSeconds: 180
    LoadBalancers:
      - ContainerName: "HelloCloud"
        ContainerPort: 8080
        TargetGroupArn: !Ref HelloCloudALBTG
    NetworkConfiguration:
      AwsvpcConfiguration:
        SecurityGroups:
          - !Ref ServiceSG
        Subnets: !Ref containerSubnetsId
In this section of the template, we create a new target group and configure the port exported by the container and some of the health check parameters like the path where we should send requests to check if the container is available, the number of failed health checks before we declare the target unavailable and the period between these checks.
When our target is a Fargate container is very important that we set the Target Type parameter to ip, because by default the value of this parameter is instance, which is not suitable for Fargate.
Also, we add a Listener Rule to the Load Balancer Listener we created before, set the route condition as path-pattern with the value that has to match to route the request to our Target Group.
The Service will be in charge of creating our tasks, so here we have to configure some parameters like the desired number of containers that will be running at the same time, so in case one of the containers get stopped by the health check, a new one will be started automatically by ECS.
We also attach the service to our ECS Cluster and define that the type of tasks started by our service will be Fargate.
I want to highlight especially the HealthCheckGracePeriodSeconds parameter, this parameter defines the time in seconds before the health check starts to work. It is very important to set enough time to be sure that your container will be up and running before the health check starts to do their job otherwise, it will stop your container continuously.
Lambda
LambdaECRRole:
  Type: AWS::IAM::Role
  Properties:
    RoleName: !Join ['-', [!Ref prefix, 'lambda-ecr-role']]
    AssumeRolePolicyDocument:
      Statement:
      - Effect: Allow
        Principal:
          Service: [lambda.amazonaws.com]
        Action: ['sts:AssumeRole']
    Path: /
    ManagedPolicyArns:
      - "arn:aws:iam::aws:policy/service-role/AWSLambdaVPCAccessExecutionRole"
    Policies:
    - PolicyName: !Join ['-', [!Ref prefix, 'lambda-ecr-policy']]
      PolicyDocument:
        Statement:
        - Effect: Allow
          Action:
            - 'ecs:UpdateService'
            - 'ecs:ListServices'
            - 'ecs:RunTask'
            - 'ecs:StartTask'
          Resource:  '*'

LambdaECS:
  Type: "AWS::Lambda::Function"
  DependsOn: [ LambdaECRRole, ECSCluster ]
  Properties:
    FunctionName: !Join ['-', [!Ref prefix, 'lambda-ecr']]
    Description: 'Start a new task when the ecr image changes'
    Handler: "index.lambda_handler"
    Role: !GetAtt LambdaECRRole.Arn
    Code:
      ZipFile:
        import boto3
        import os

        region = os.environ['AWS_REGION']
        ecsClusterName = os.environ['ECS_CLUSTER_NAME']

        def lambda_handler(event, context):
            print 'EVENT: ' + str(event)

            if event['detail']['result'] == 'SUCCESS':
                repositoryName = event['detail']['repository-name']

                print 'CHANGE IMAGE SUCCESSFUL: ' + repositoryName

                ecs = boto3.client('ecs', region_name=region)
                response = ecs.list_services( cluster=ecsClusterName )

                print response

                for serviceArn in response['serviceArns']:
                    serviceName = serviceArn.split('/')[1];
                    print 'Service Name ' + serviceName
                    if serviceName.startswith(repositoryName):
                        print 'Updating Service ' + serviceName + ' in cluster ' + ecsClusterName
                        ecs.update_service( cluster=ecsClusterName, service=serviceName, forceNewDeployment=True );
    Runtime: "python2.7"
    Timeout: 300
    MemorySize: 128
    ReservedConcurrentExecutions: 1
    VpcConfig:
      SecurityGroupIds:
        - !Ref ServiceSG
      SubnetIds:
        - !Ref containerSubnet1Id
        - !Ref containerSubnet2Id
    Environment:
      Variables:
        ECS_CLUSTER_NAME: !Ref ECSCluster
This Lambda function is where the magic happens, it will start a new task once it is triggered by a CloudWatch Event. In order to be able to perform this action in ECS, we have to define a Role and set the necessary permissions.
In this role, we’ve configured a policy that grants permission to list services, update services and start/run a new task.
This Lambda function will execute the python code that is inside the Code section, which I will explain more in detail later. We attach this function to the container subnets that we defined in the containerSubnetsId parameter and set a variable environment with the ECS Cluster name that we will need to get our services list.
Lambda Code
Here we will explain step by step each part of the python code to start a new task.
import boto3
import os
First, we need to import two libraries, boto3 contains the AWS python sdk and os has some functions to interact with the operating system.
region = os.environ['AWS_REGION']
ecsClusterName = os.environ['ECS_CLUSTER_NAME']
We get the values from the environment variables that are in the context, one is the AWS Region and the other is the ECS Cluster name that we defined as environment variable in the Lambda function.
def lambda_handler(event, context):The function lambda_handler is the method that Lambda looks for starting the execution and define two parameters, the event that invokes the function and the context.
if event['detail']['result'] == 'SUCCESS':Inside the function, we check if the result of the event was successful otherwise, we don’t continue with the function because it means that the repository was not updated properly and the image might be corrupted.
repositoryName = event['detail']['repository-name']In case the event is successful, we get the repository name from the details of the event.
ecs = boto3.client('ecs', region_name=region)
response = ecs.list_services( cluster=ecsClusterName )
Using the boto3.client method we instantiate the ecs client and call the method list_services to get all the services from the cluster name specified in the parameters.
for serviceArn in response['serviceArns']:
		  serviceName = serviceArn.split('/')[1];
		  if serviceName.startswith(repositoryName):
			  ecs.update_service( cluster=ecsClusterName, service=serviceName, forceNewDeployment=True )
We get the list of services ARNs from the list_services response and get the service name from the ARN (Amazon Resource Name) and check if the service name starts with the repository name that generated the event.
Making the service name starts with the respository that is linked to it, is what makes posible to start the right task.
In case the service name matches this condition, we call the update_service method to force start a new deployment.
CloudWatch Event
CloudWatchECRRule:
  Type: "AWS::Events::Rule"
  DependsOn: [ LambdaECS ]
  Properties:
    Name: !Join ['-', [!Ref prefix, 'ecr-rule-event']]
    Description: "ECR Rule that is fired when there is an ECR event"
    EventPattern: '{"source": ["aws.ecr"]}'
    Targets:
      - Id: !Join ['-', [!Ref prefix, 'lambda-ecr-id']]
        Arn: !GetAtt LambdaECS.Arn

LambdaECREventPermission:
  Type: AWS::Lambda::Permission
  DependsOn: [ LambdaECS, CloudWatchECRRule ]
  Properties:
    Action: lambda:InvokeFunction
    FunctionName: !GetAtt LambdaECS.Arn
    Principal: 'events.amazonaws.com'
    SourceArn: !GetAtt CloudWatchECRRule.Arn
Finally, we create a CloudWatch event rule that will listen to any change in ECR and send the event to our Lambda function in case something occurs, but in order to allow this CloudWatch event to invoke our Lambda function, we need to configure permissions for that.
Testing the example
Once our Cloudformation template is created successfully, is the moment to test whether all we just built work as we expect.
To do that, first we need to get the Load Balancer DNS name, you can find that value in the Outputs of the template in the Cloudformation section.

To test our container we can open a browser and check the following URL: http://[loadbalancer-dns]/hellocloud/api/version.
For example, http://ecr-icd-alb-external-701604405.eu-central-1.elb.amazonaws.com/hellocloud/api/version and you should get a response like this:
{
   "version":"0.0.1"
}
The version number that returns the endpoint is defined inside the file /hellocloud/hellocloud-service/src/main/resources/application.properties
logging.level.cloud.godof=DEBUG
project.version=0.0.1
Change this number and follow the same steps we’ve done before to build the project, create the docker image and push it to AWS.
Build the project using the command mvn package in the directory where the file pom.xml is located once the build is finished execute one of the push-image2ecr scripts.
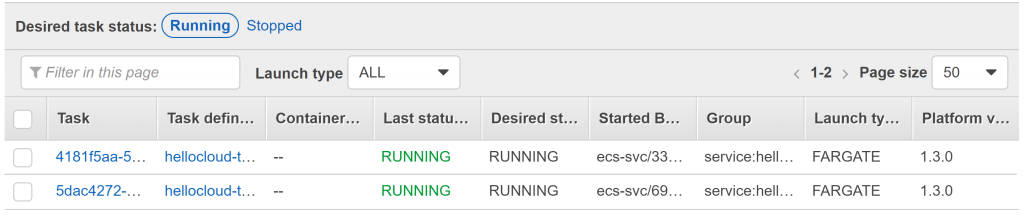
If you check the ECS Cluster tasks in the AWS Console you should see that a new task has been created automatically and for some minutes both tasks will be running at the same time until the oldest is stopped.
Now, if you try again the previous URL you should see the new version number you’ve just defined.
Conclusion
Thanks to the great flexibility that AWS provides, we can improve our cloud environment with new features that are suitable for our requirements.
Taking advantage of CloudWatch events and Lamba is a good way to automate tasks, for instance, you could launch an event every evening that calls a Lambda function that stops some of your EC2 instances to reduce costs.
Troubleshooting
This project is not simple at all, so it’s possible that during one or more of the previous steps you can face issues and errors, in this section I will include some of the problems I’ve found creating this example. If you find other problems please leave it in the comments and I’ll try to fix them and add them in this section for future readers.
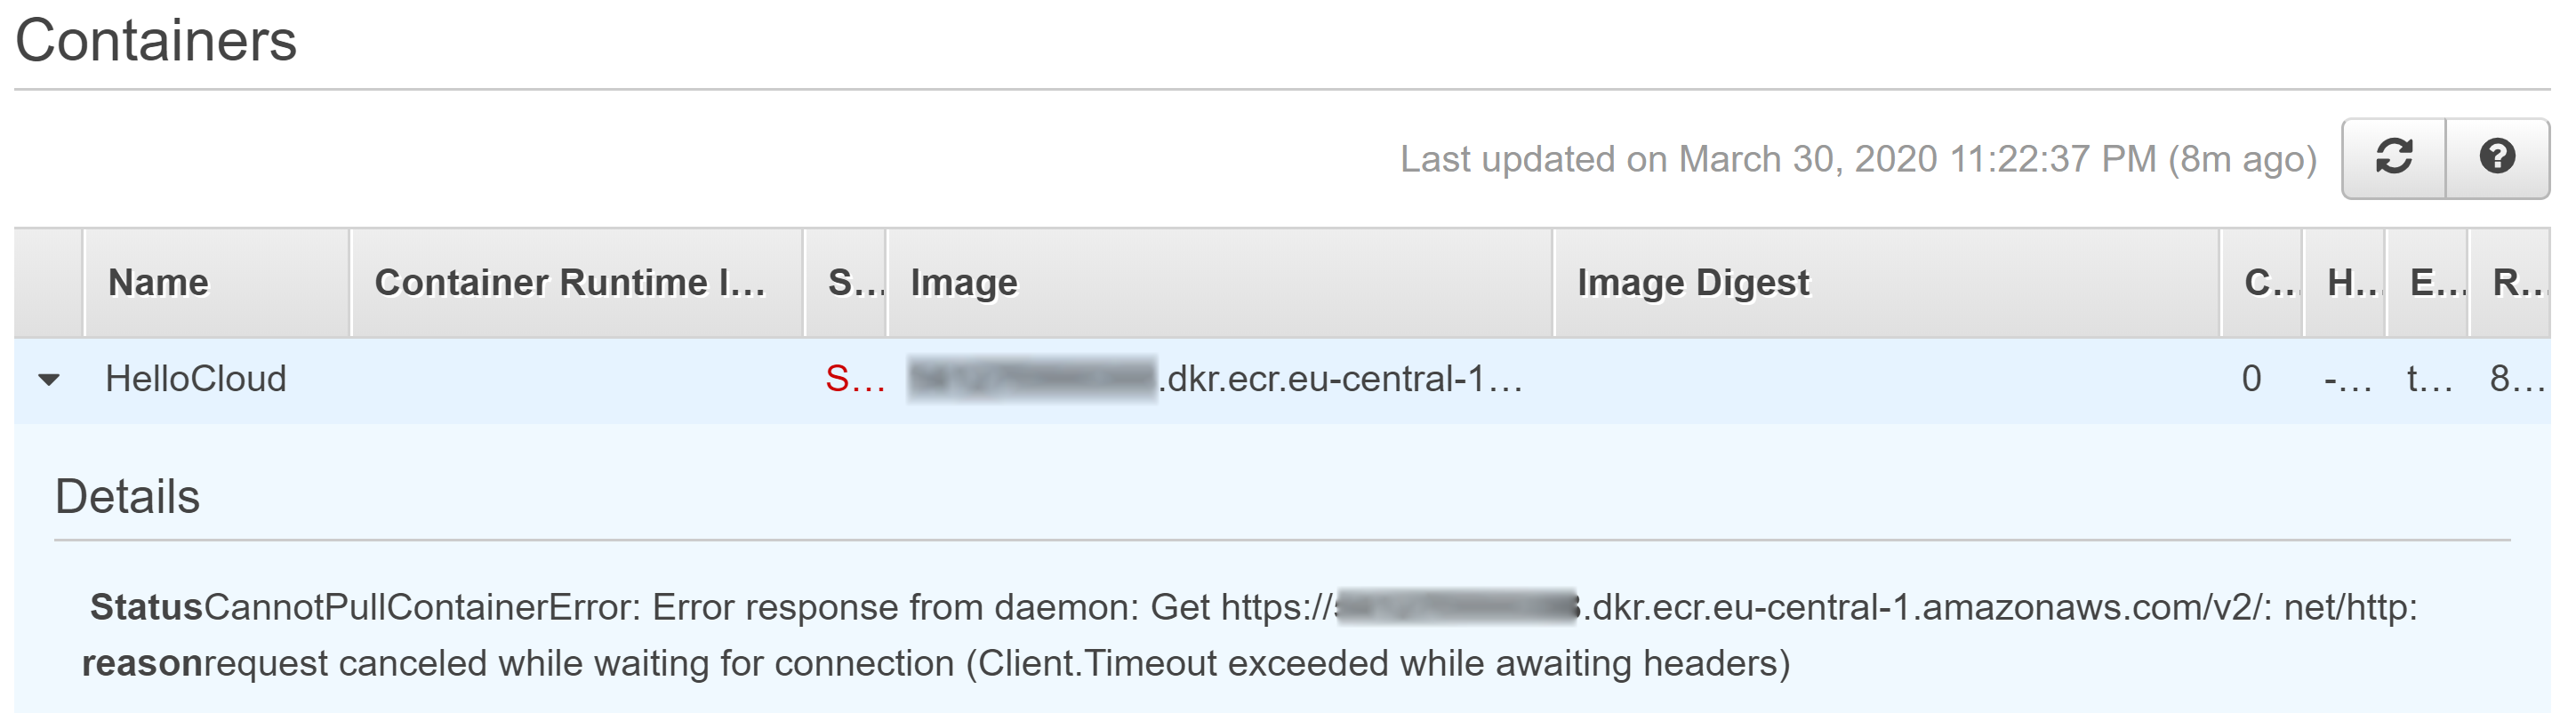
The task is not started
One of the most common problems and the first one that I have to overcome was that the task was never created. The main reason for this issue is that ECS doesn’t have a way to pull the image from ECR.
The solution for this issue is to create a Nat Gateway or a VPC Endpoint to provide connectivity with ECR.
The task does not reach the running state
Another of the issues that you might face and one of the most annoying is that the task is restarting continuously without reaching the running state. It is very likely that the reason is that the health check that we’ve configured is failing or probably the time that we set in the HealthCheckGracePeriodSeconds parameter of the ECS Service is not enough.
Debug errors starting containers
When we are running into issues like the ones that we described above, be able to know the reason is essential to understand what is failing.
Because the container is not initiated there is nothing in the logs, but in the task details, we can find some information that can help us to find out what the problem is.
Find this information is quite tricky so I’ll explain it step by step:
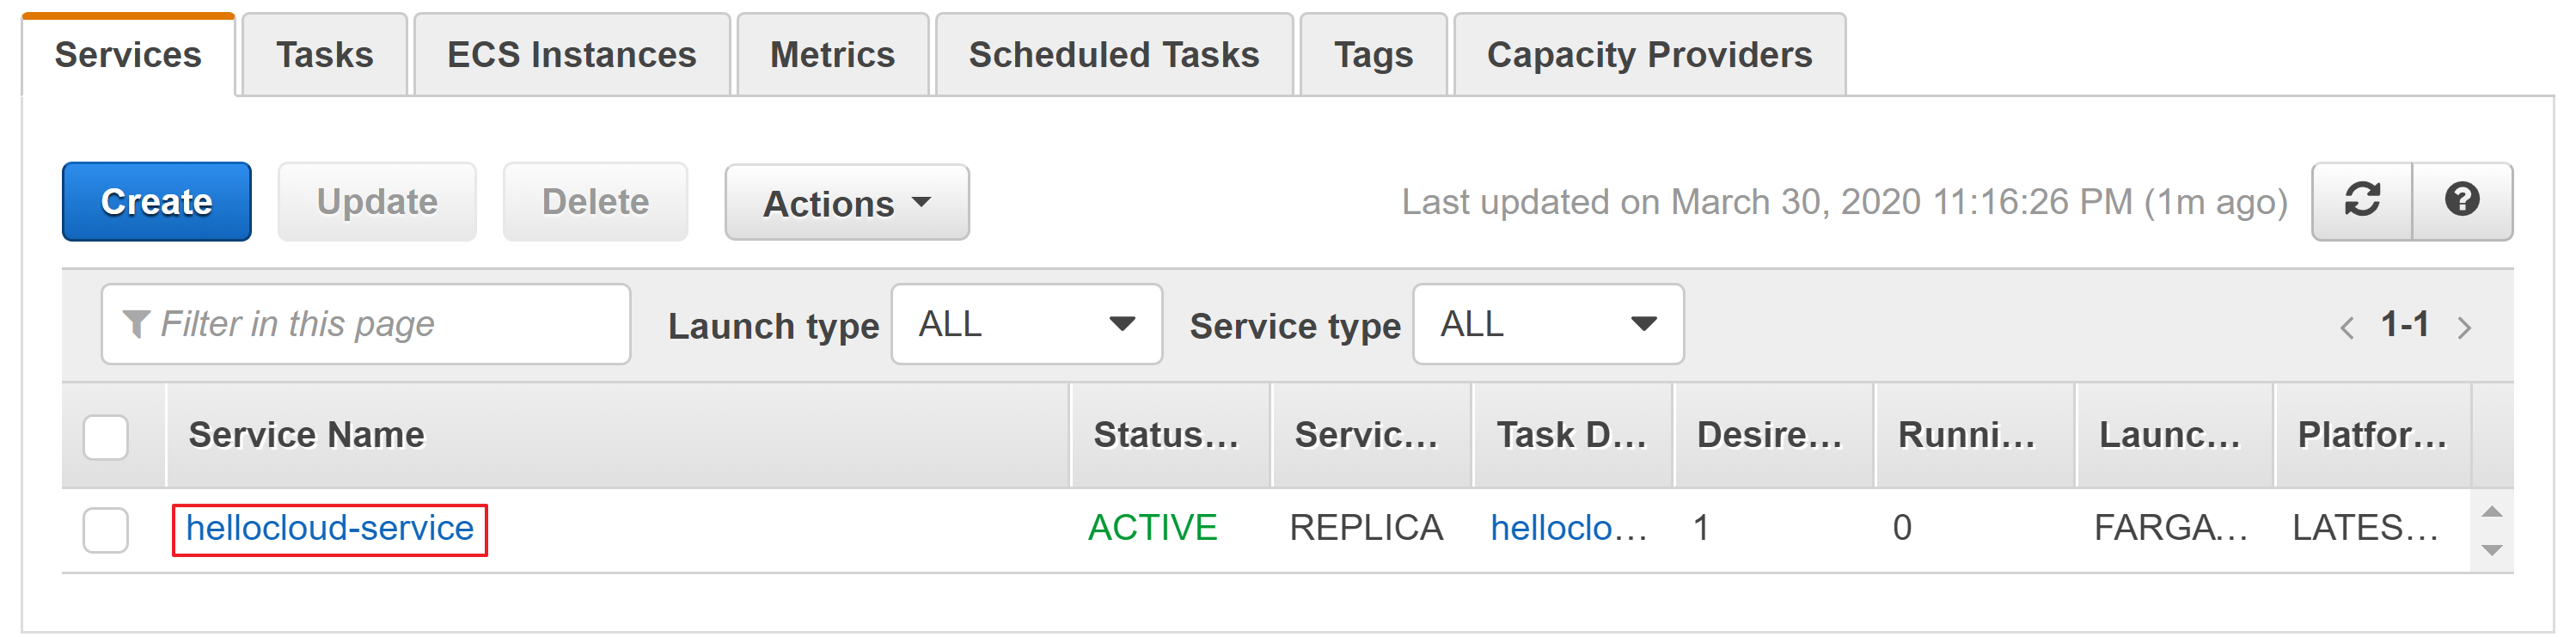
- Open the AWS Console and open the services that and type ECS in the filter.
- Go to the ECS Section and select the ECS Cluster.
- In the Services tab select the service that launches the task that is failing.
- Select the Tasks tab and show the tasks with status stopped.
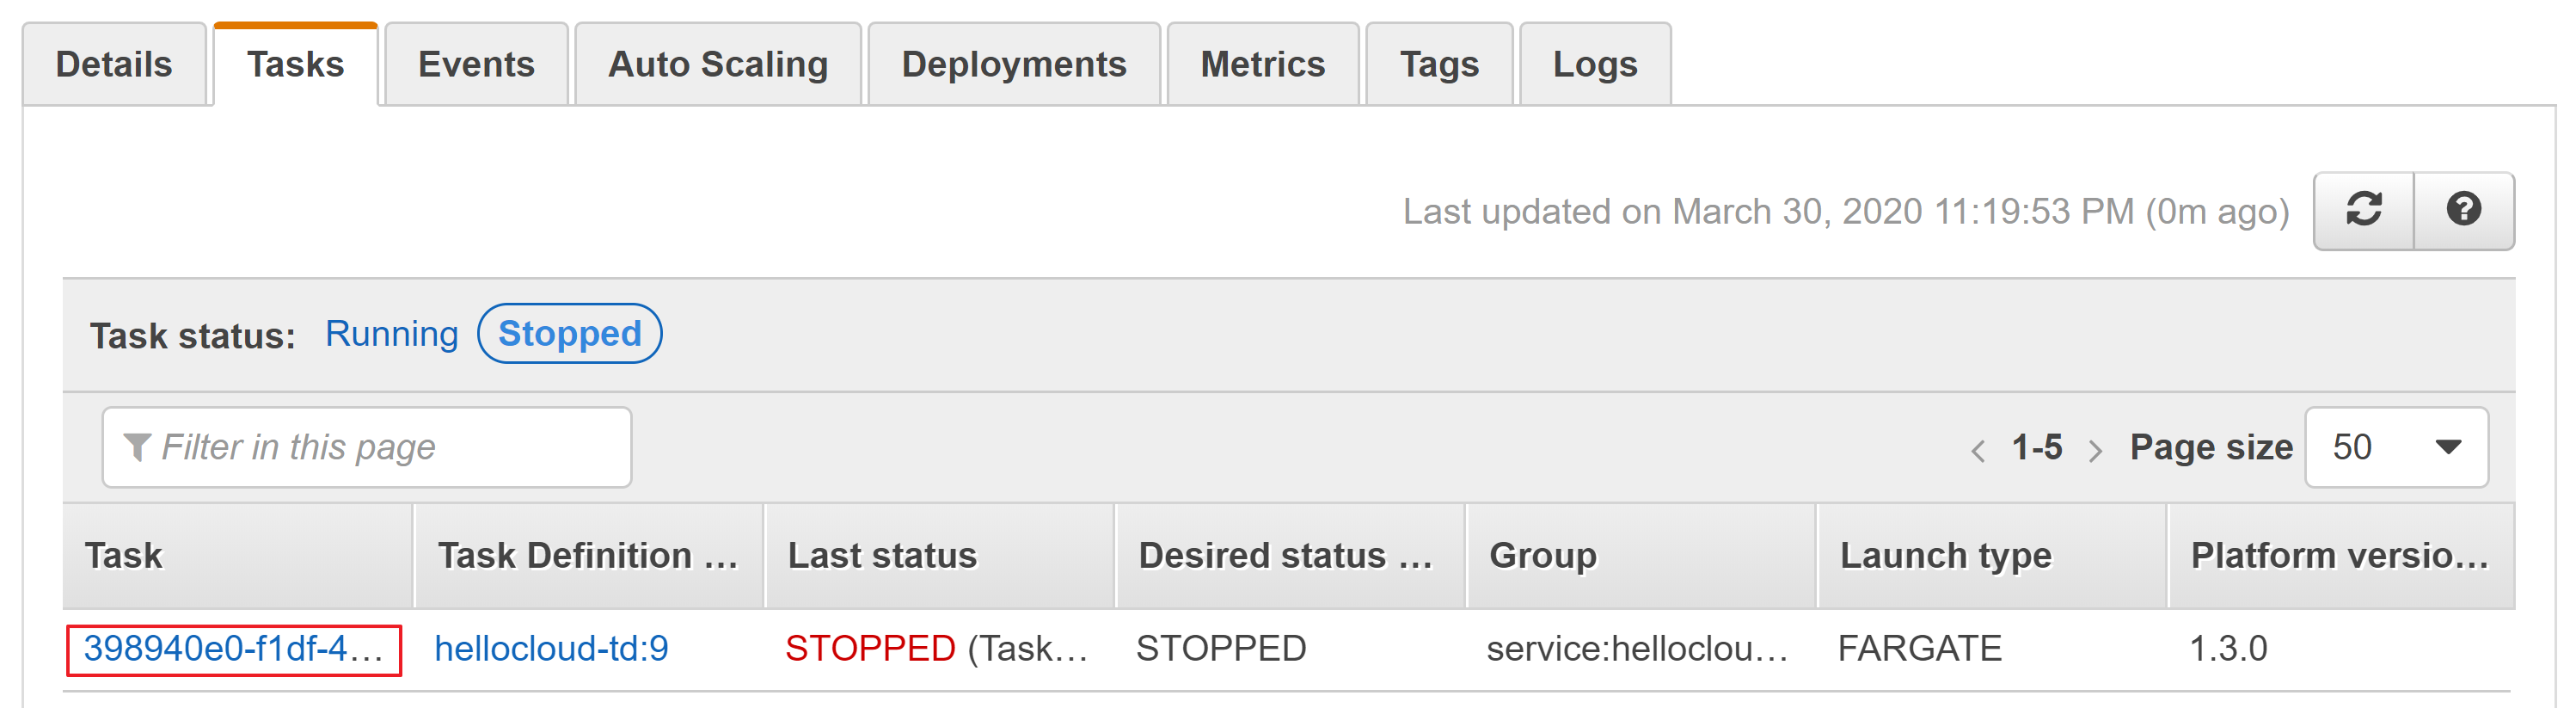
- Select the Task name and on the next page go down until the containers section.
- Unfold the container name and in the Details section, it should appear the error message.