
When you write your infrastructure as code using Cloudformation for small projects, it might make sense to define all your resources in the same template, but as your project might grow bigger, it is a good practice to separate your resources in different stacks from the very beginning.
Here, I will explain how to create a master template that orchestrates other stacks and how to create custom Macros.
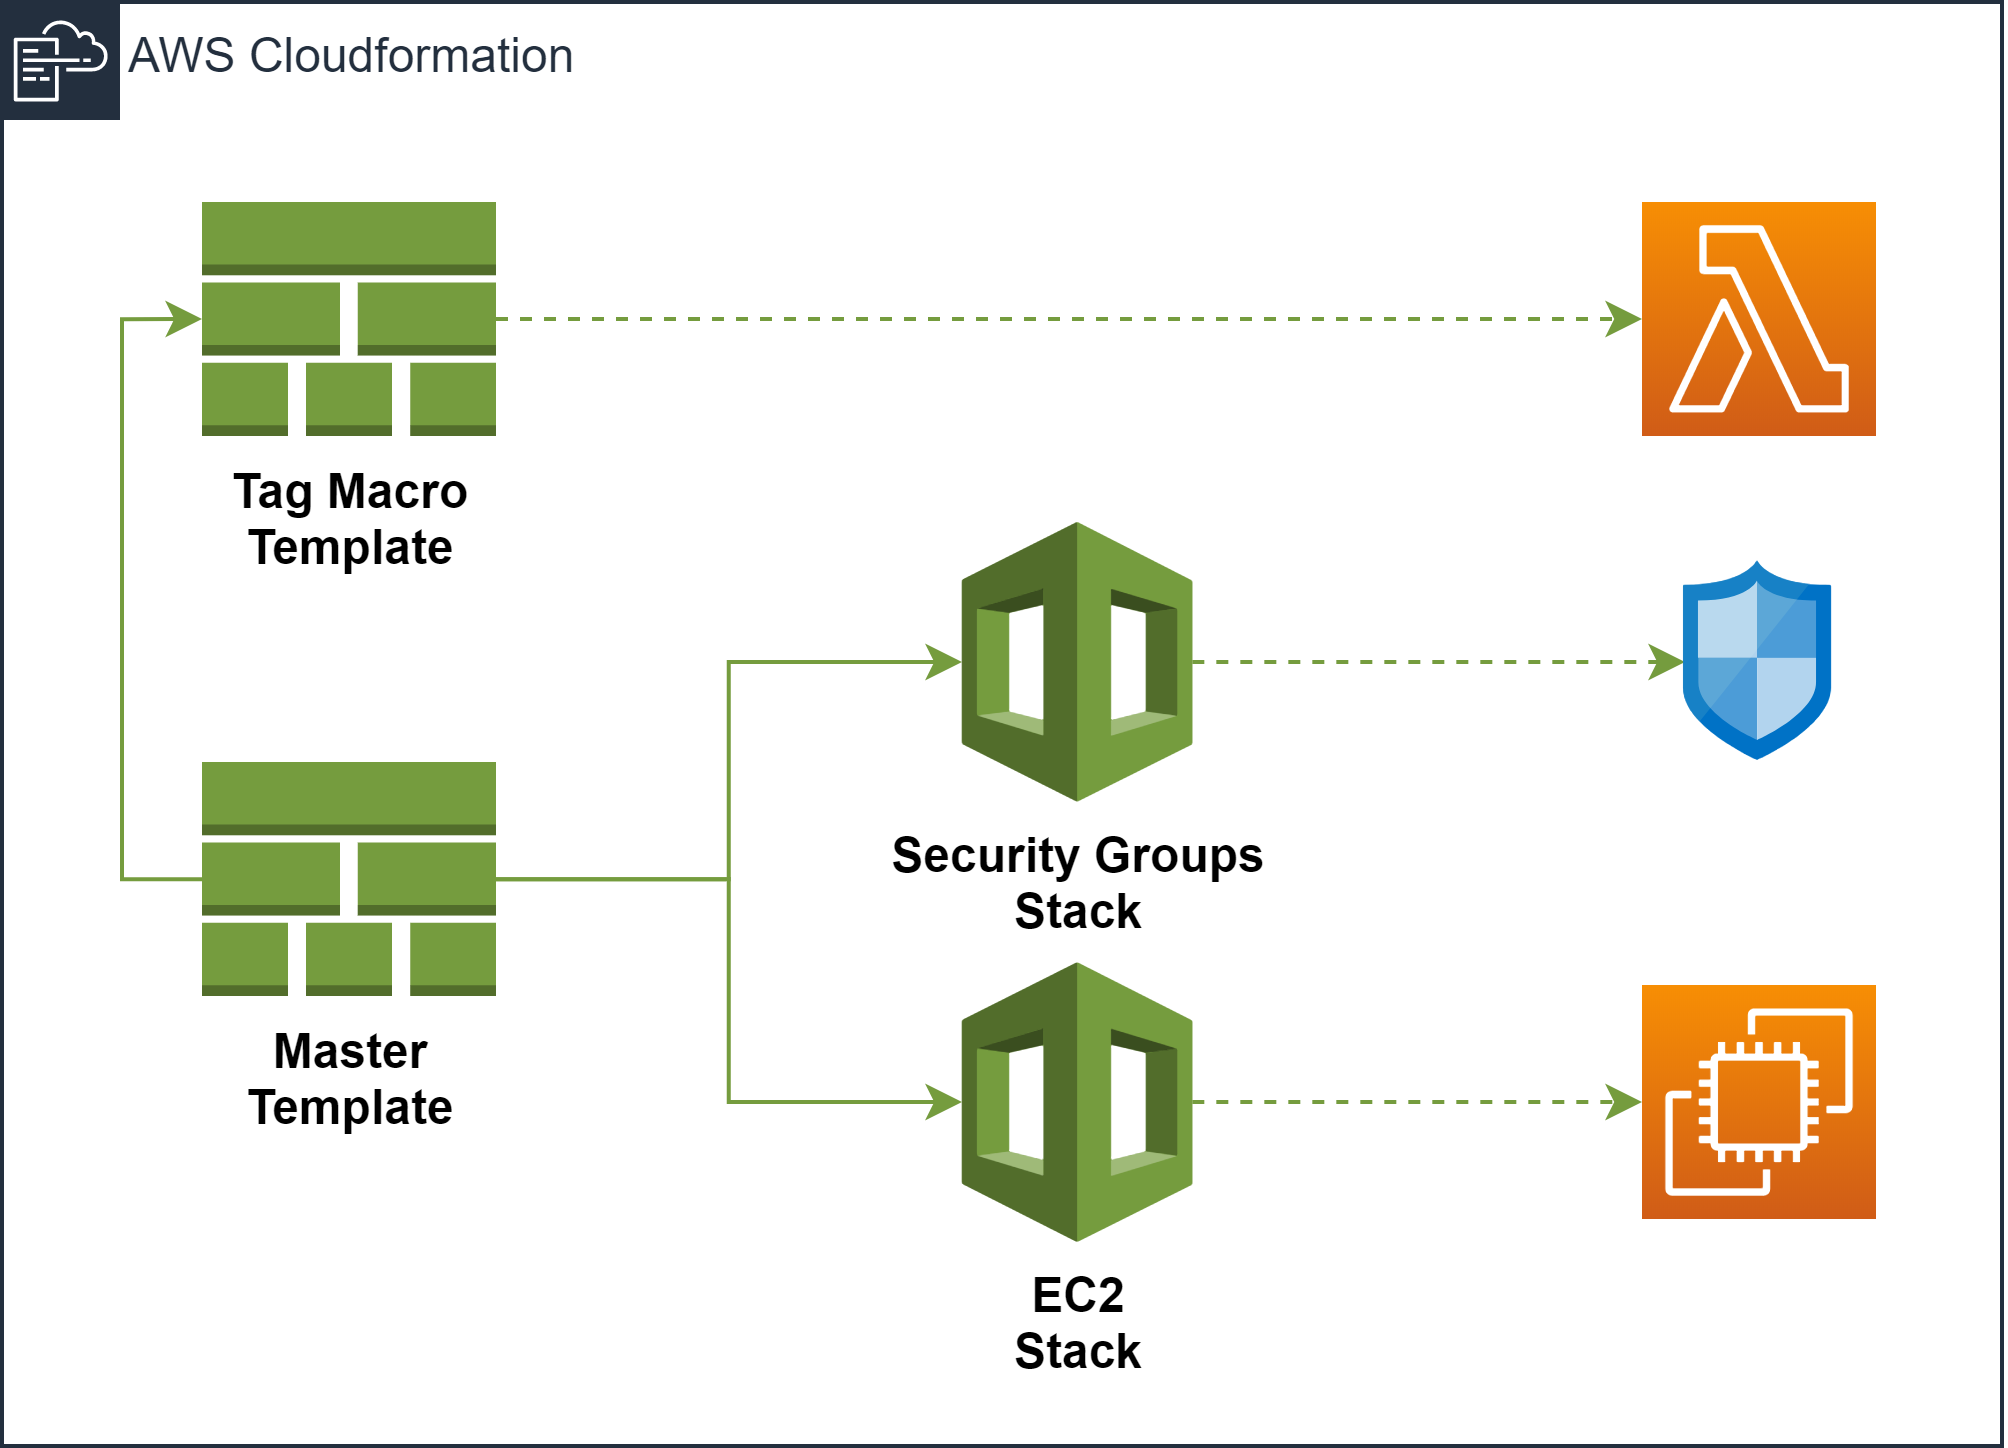
The diagram above shows the elements that make up our use case, which consists of a template that creates a Macro that we will use to add tags dynamically in other templates and a Master template, that orchestrates the creation of two stacks, one that creates a security group and another that creates an EC2 Instance.
But this time the resources that we are going to create are not very relevant, but how we organize our resources. To follow this use case you can download all the resources from the God of Cloud GitHub repository.
Requirements
To be able to create the stacks in your AWS Account, you would need to upload the artifacts and templates folders from GitHub to an S3 Bucket, if you don’t have any you should create one because that’s the only way to create Cloudformation templates that contain nested stacks.
If you are an advanced user, I also provide the source code for the lambda tags function, just in case you want to customize or play around a little bit.
Macro Tags Template
As we mentioned before, this template creates a Lambda function that will be used for our macro to add tags dynamically in other templates, that’s why we have it in a separate template because it must be created before other templates can use it.
Macros are functions that can change dynamically the content of our template, can be defined globally (at a template level) or locally (at a resource level)
Macros can be defined globally using the Transform section of the template or locally using the Transform intrinsic function. When we use the Transform section, the Macro will receive the whole template except the Transform section, but if instead, we use the intrinsic function, the Macro will receive only the siblings’ properties and its children.
It will be easier to understand with an example, let’s take the following snippet:
ExampleSecurityGroup:
   Type: AWS::EC2::SecurityGroup
   Fn::Transform
      Name : my-macro
   Properties:
      GroupName: 'example-sg'
      VpcId: !Ref vpcId
      SecurityGroupIngress:
        - Description: Allow SSH
          IpProtocol: tcp
          FromPort: '22'
          ToPort: '22'
          CidrIp: 0.0.0.0/0
Because we placed the Transform intrinsic function at the same level as the Type and Properties parameters the Macro will get the following fragment in JSON format:
{
   "Type": "AWS::EC2::SecurityGroup",
   "Properties": {
     "GroupName": "example-sg",
     "VpcId": { "Ref" : "vpcId" },
     "SecurityGroupIngress": [
   	{
   	  "Description": "Allow SSH",
   	  "IpProtocol": "
   	  "FromPort": "22",
   	  "ToPort": "22",
   	  "CidrIp": "0.0.0.0/0"
   	}
     ]
   }
}
When a Macro is used, sends an event to the Lambda function that has been defined with the following information:
- accountId: Account identifier from which the macro is invoking the Lambda function
- region: Region where macro has been created.
- fragment: Snippet of the template that the macro is going to process, in case of a Macro defined in the Transform section will be the whole template.
- transformId: Name of the macro that invokes the function.
- params: Contains the parameters defined in the Transform intrinsic function.
- requestId: Request identifier.
- templateParameterValues: Contains the parameters defined in the template.
Once the Lambda function process the template, will send an answer with the following values:
- requestId: Must contain the same request ID that we receive from the macro.
- fragment: Template snippet that has been processed by the Lambda function.
- status: Status of response that can contain the values SUCCESS or FAILURE.
Just in case you want to know more about macros I would recommend having a look at the AWS documentation https://docs.aws.amazon.com/AWSCloudFormation/latest/UserGuide/template-macros.html.
Parameters
prefix:
  Type: String
  Default: oswc
resourcesBucket:
  Type: String
lambdaBucketKey:
Type: String- prefix: The value that will be appended in the resource’s name that we are creating to be sure that there is any conflict with other resources that you might have, by default own.
- resourcesBucket: Bucket name where you have copied the resources from GitHub
- lambdaBucketKey: The bucket key to the lambda-tags.jar, by default artifacts/lambda-tags.jar, in case you put it in the root folder of the bucket otherwise you should change it.
Macro
MacroTags:
  Type: AWS::CloudFormation::Macro
  DependsOn: [ LambdaTags ]
  Properties:
    Name: 'tags'
    Description: "Add the tags in the resources"
    FunctionName: !Ref LambdaTags
Here we define our macro, we just need to specify the name and the lambda function that is going to invoke.
Regarding the name, Cloudformation has a limitation that doesn’t allow to use the Ref intrinsic function, but if you want to set the name dynamically you can use the Sub intrinsic function, like this:
Name: !Sub '${prefix}-tags'But because for this use case we are going to use the macro in the master template, I’ve preferred to hardcode the name, so all the naming is consistent.
Tags Lambda
This Lambda function is the heart of our macro, it will get the tags defined in the template parameter, read the template looking for the Properties property of the stack resource, and append a Tags property with the expected Cloudformation JSON format.
Now, let’s dive into the source code a little bit and see how the Lambda function works.
In the Handler class is where the magic happens, the function handleRequest is the entry point for our Lambda function.
final Map<String, Object> responseMap = new HashMap<String, Object>();
responseMap.put(Constants.REQUESTID, event.get(Constants.REQUESTID));
responseMap.put(Constants.STATUS, Constants.FAILURE);
The first thing we do is create the response and set the requestId we have received in the event and the status to Failure (we prepare ourselves for the worst-case scenario).
final Map<String, Object> templateParams = (Map<String, Object>) event.getOrDefault(Constants.TEMPLATE_PARAMS, new HashMap<>());
if (!templateParams.containsKey(Constants.TAGS)) {
   throw new RuntimeException("tags param in template parameters is required");
}

paramTags = (String) templateParams.get(Constants.TAGS);
Next thing, we check if the template parameters contain the tags param, this is mandatory for our macro.
final Object fragment = event.getOrDefault(Constants.FRAGMENT, new HashMap<String, Object>());
final Object retFragment;
if (fragment instanceof Map) {
   retFragment = iterateFragment((Map<String, Object>) fragment);
} else {
   retFragment = fragment;
}
If everything is ok, we get the fragment with the template snippet and we start to process it.
private Map<String, Object> iterateFragment(final Map<String, Object> fragment) {
   final Map<String, Object> retFragment = new HashMap<String, Object>();
   fragment.forEach((key, value) -> {
      if (Constants.PROPERTIES.equals(key)) {
         Map<String, Object> propertiesFragment = (Map<String, Object>) value;
         propertiesFragment.put(Constants.PROPERTY_TAGS, processTags(paramTags));
         retFragment.put(key, propertiesFragment);
      } else {
         if (value instanceof Map ) {
            retFragment.put(key, iterateFragment((Map<String, Object>) value));
         } else {
            retFragment.put(key, value);
         }
      }
   });

   return retFragment;
}
This recursive function iterate over the HashMap looking for the Properties property, and once we find it, we add the Tags property with the tags that we generate following the Cloudformation JSON format.
Don’t use custom objects with Jackson annotations, build your objects using HashMaps
One funny thing is the fact that if you use Java as a language for your macro, you cannot use custom objects with Jackson annotations to generate the JSON response, you have to use HashMaps otherwise Cloudformation won’t recognize the object.
Master Template
We are going to use this template to define our nested stacks and coordinate the creation of the resources. AWS encourages the use of nested stacks as good practices when common patterns are detected, like creating an Application Load Balancer, so instead of having the same resource’s definition in several templates, you can create a dedicated template for a specific resource and reuse it even between different projects.
What I propose here, is taking advantage of the nested stacks to split the infrastructure that we want to build in small templates like security groups, roles, load balancers, ec2, etc and make reference to them from a global template to build our project as a single unit.
Parameters
prefix:
  Type: String
  Default: oswc
templateURL:
  Type: String
vpcId:
  Type: AWS::EC2::VPC::Id
instanceType:
  Type: String
  AllowedValues: ['t2.micro', 't2.small']
  Default: 't2.micro'
subnetId:
  Type: AWS::EC2::Subnet::Id
tags:
  Type: String
  Default: 'application=Orchestrate Stacks,author=GodOfCloud'
These are the parameters that the master template needs, but I would like to focus on two of them in particular:
- templateURL: This is the URL to the bucket that contains the templates that you copied before, this URL will be used by the stack to find the proper template
- tags: Here we define the tags that we want to apply to our resources, we use the Key=Value format because it is the format that the Lambda function expects.
If you want to use the same master template to deploy your resources in different environments like development or production, it probably would be more suitable for you to define a Mapping with the values for each environment.
Mappings
In case you want to deploy the same master template in different environments, mappings come to the rescue. If you haven’t used mappings before, it is a key-values definition where you can hardcode values and choose one or another depending on a key.
In the stack ec2-stack.yml, we use mappings to define the Amazon Linux AMIs that belong to each AWS region.
Mappings:
  AWSRegionToAMI:
    eu-west-2:
      AMIID: ami-0d8e27447ec2c8410
    ca-central-1:
      AMIID: ami-0d4ae09ec9361d8ac
    us-west-2:
      AMIID: ami-082b5a644766e0e6f
    ap-east-1:
      AMIID: ami-570c7726
    us-east-2:
      AMIID: ami-0d8f6eb4f641ef691
This is a snippet of the mapping (because it’s very long) but you can get an idea of how a mapping looks like.
To get the value of the AMI we use the FindInMap intrinsic function defining the mapping name, the top-level key, and the second level key of the value that we want to get, for instance:
ImageId: !FindInMap [AWSRegionToAMI, !Ref 'AWS::Region', AMIID]So, coming back to the different environments analogy, the mapping that we should build would look like this:
Mappings:
  Environment:
    dev:
      Prefix: dev-oswc
      TemplateURL: https://mybucket-dev.s3.us-east-1.amazonaws.com/templates
      VpcId: vpc-0t9aaa7er0ft90012
      InstanceType: 't2.micro'
      SubnetId: subnet-012345ttte3u8771h
      tags: 'application=Orchestrate Stacks,author=GodOfCloud'
    prod:
      Prefix: prod-oswc
      TemplateURL: https://mybucket-prod.s3.us-east-1.amazonaws.com/templates
      VpcId: vpc-0t9aaa7er0ft80765
      InstanceType: 't2.small'
      SubnetId: subnet-012345ttte3f7665s
      tags: 'application=Orchestrate Stacks,author=GodOfCloud'
Transform
Transform:
  - tags
In the transform section of our template, we put the macros that process the whole template, for our use case it is the best option because we don’t want to add the Transform intrinsic function in every single stack resource, so defining our macro as global will be adding the tags in all the stacks.
One thing very cool about adding the tags directly in the stack is that all the resources created inside the stack will inherit them.
Stacks
SecurityGroupsStack:
  Type: AWS::CloudFormation::Stack
  Properties:
    TemplateURL: !Join ['/', [!Ref templateURL, 'security-group-stack.yml' ] ]
    Parameters:
      prefix: !Ref prefix
      vpcId: !Ref vpcId

EC2Stack:
  DependsOn:
    - SecurityGroupsStack
  Type: AWS::CloudFormation::Stack
  Properties:
    TemplateURL: !Join ['/', [!Ref templateURL, 'ec2-stack.yml' ] ]
    Parameters:
      prefix: !Ref prefix
      instanceType: !Ref instanceType
      subnetId: !Ref subnetId
      securityGroupId: !GetAtt SecurityGroupsStack.Outputs.SecurityGroupId
This is how we define Stacks in a template, it’s pretty straight forward, isn’t it?
As you might notice one of the parameters that our Stack needs is the templateUrl, here we use the Join intrinsic function to concatenate the template URL defined as a parameter of our master template with the template name.
Stacks can also define their parameters that will be used by the template, for example in the SecurityGroupsStack we need to define the prefix and the VPC id to create the Security Group.
In case you need in one template as an input parameter a resource attribute from another template, you can get that value using the GetAtt intrinsic function followed by [StackName].Outputs.[OutputName], for example in our EC2Stack we have as an input parameter the Security Group ID that has been created in the SecurityGroupsStack.
securityGroupId: !GetAtt SecurityGroupsStack.Outputs.SecurityGroupIdTo be able to get values form other stacks, those values must be exposed as Outputs
As we have seen in the example before some stacks can depend on resources created by other stacks, to be sure that those resources have been created before our template is processed, we can use the property DependsOn and set the list of resources that our stack depends on.
AWS already detects dependencies between resources that use the Ref intrinsic function, but I like to put the DependsOn parameter anyway to detect easily which dependencies have my Stacks.
Conclusion
Using a master template with nested stacks is a good practice to organize your resources and reuse common patterns. Even if you think that your project is small and it is not necessary, I really recommend you to do it, because you never know how much the project can grow and split it in nested stacks later can be difficult especially if it is already in Production.