
A Virtual Private Cloud or VPC is one of the basic elements to start building your infrastructure in the Cloud. It provides isolation for our resources and security.
When we create an account in AWS, a default VPC is set up on our behalf. This makes very easy to start creating resources in it, but after playing around, you will soon realize that you need a more customized network.
In the following lines, I will guide you step by step in the creation of all the resources you will need to create your own VPC using Cloudformation.
To make it easier, I’ve created a Cloudformation template that you can use and follow all the process. You will find it my GitHub: https://github.com/godof-cloud/aws-vpc-natgateway
Before start, let me show you how our VPC will look like:
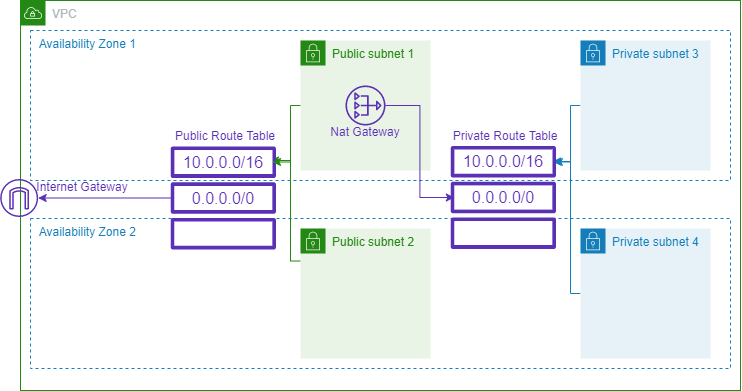
Our VPC will consist of 4 subnets (two public and two private), the fact that a subnet will be configured public or private will depend on which route table is associated. Basically, all the subnets associated with the routing table where the internet gateway is configured would be public.
Optionally, we can decide to create a NatGateway, this resource would give internet connectivity to our private subnets.
Now that we know what we are going to build, let’s get our hands dirty …
Parameters
This will be the first part of our template, here we define custom values to configure the VPC.
prefix:
  Type: String
  Default: custom
sgCidr:
  Type: String
  Default: 0.0.0.0/0
vpcCidrBlock:
  Type: String
subnetCidrBlocks:
  Type: List<String>
vpcCidrRange:
  Type: String
  Default: 16
subnetCidrRange:
  Type: String
  Default: 24
createNatGateway:
  Type: String
  Default: false
  AllowedValues:
    - true
- false- prefix: This value will be appended in the resource’s name that we are going to create to be sure that there is any conflict with other resources that you might have, by default is custom.
- sgCidr: Custom IP to configure the Security Group to allow access only from the specified IP that you can define, by default is 0.0.0.0/0 which means open to the internet.
- vpcCidrBlock: IP block for the VPC network , for example, 10.0.0.0
- subnetCidrBlocks: IP blocks for the subnets separated by commas, for example, 10.0.1.0, 10.0.2.0, 10.0.3.0, 10.0.4.0
- vpcCidrRange: IP range for the VPC, by default 16.
- subnetCidrRange: IP range for the Subnets, by default 24.
- createNatGateway: Flag to decide if the template would create a NatGateway.
Conditions
Conditions:
  EnabledNatGateway: !Equals [ !Ref createNatGateway, 'true' ]
Because the creation of the resources for the NatGateway depends on the value of createNatGateway parameter, in the Conditions section we use the Ref Intrinsic Function to get the value of the parameter and the Equals Intrinsic Function to check if the value equals true.
Doing that we initialize the variable EnabledNatGateway with the result and we will use this variable in some resources to specify that should be only created when the condition is satisfied.
If you want to know more about Intrinsic Functions I recommend you have a look at the Cloudformation documentation in this link: https://docs.aws.amazon.com/AWSCloudFormation/latest/UserGuide/intrinsic-function-reference.html
Resources
VPC
VPC:
  Type: AWS::EC2::VPC
  Properties:
    CidrBlock: !Join ["/", [!Ref vpcCidrBlock, !Ref vpcCidrRange]]
    EnableDnsHostnames: true
    EnableDnsSupport: true
    Tags:
      - Key: "Name"
        Value: !Join ["-", [!Ref prefix, "vpc"]]
This block creates the VPC, when the property EnableDnsHostnames is set to true the EC2 instances that are created in the VPC get DNS hostnames and the EnableDnsSupport indicates whether the DNS resolution is supported for the VPC.
If you kept the value of the parameter vpcCidrRange to 16, that means that our VPC will be able to host 65536 IPs approximately.
Security Group
DMZSecurityGroup:
  Type: AWS::EC2::SecurityGroup
  Properties:
    GroupName:  !Join ['-', [!Ref prefix, 'dmz-sg']]
    GroupDescription: DMZ Security Group to allow Access to SSH
    VpcId: !Ref VPC
    SecurityGroupIngress:
      - Description: Allow SSH
        IpProtocol: tcp
        FromPort: '22'
        ToPort: '22'
        CidrIp: !Ref sgCidr
      - Description: Allow Http
        IpProtocol: tcp
        FromPort: '80'
        ToPort: '80'
        CidrIp: !Ref sgCidr
      - Description: Allow Https
        IpProtocol: tcp
        FromPort: '443'
        ToPort: '443'
        CidrIp: !Ref sgCidr
The creation of a Security Group is not really necessary, but I think is very useful at least to have a default one attached to the VPC. This security group allows SSH, HTTP and HTTPS access from the custom IP configure by the sgCidr parameter.
Subnets
Subnet1:
  Type: AWS::EC2::Subnet
  Properties:
    VpcId: !Ref VPC
    AvailabilityZone: !Select
      - 0
      - !GetAZs
        Ref: 'AWS::Region'
    CidrBlock: !Join ["/", [!Select [0, !Ref subnetCidrBlocks], !Ref subnetCidrRange]]
    Tags:
      - Key: "Name"
        Value: !Join ["-", [!Ref prefix, "subnet1"]]
In these blocks, we configure the subnets that will be created in our VPC, in this example we’ve set 4 subnets but we can add more depending on our own requirements.
Here, we use the Select Intrinsic Function to select in which Availability Zone of our Region we want to assign our subnet, in this example we will alternate our subnets between the first and the second Availability Zone of the Region, we manage that changing the index of the Select function.
Bear in mind that the Availability Zones in the Regions are not the same in all the AWS Accounts
For the subnets IP, we do something similar. We use the list provided by subnetCidrBlocks parameter to get the respective value.
Route Tables
PublicRT:
  Type: AWS::EC2::RouteTable
  Properties:
    VpcId: !Ref VPC
    Tags:
      - Key: "Name"
        Value: !Join ["-", [!Ref prefix, "public", "table"]]

PrivateRT:
  Type: AWS::EC2::RouteTable
  Properties:
    VpcId: !Ref VPC
    Tags:
      - Key: "Name"
        Value: !Join ["-", [!Ref prefix, "private", "table"]]
“A route table contains a set of rules, called routes, that are used to determine where network traffic from your subnet or gateway is directed”
AWS
For this example, we are going to create two route tables. In one of them, we will link later an Internet Gateway and the subnets that we want to expose to the internet and we keep the other for those subnets that we want to have in our private area of the VPC.
Subnet Association
RouteSubnet1:
  Type: AWS::EC2::SubnetRouteTableAssociation
  Properties:
    RouteTableId: !Ref PublicRT
    SubnetId: !Ref Subnet1

RouteSubnet3:
  Type: AWS::EC2::SubnetRouteTableAssociation
  Properties:
    RouteTableId: !Ref PrivateRT
    SubnetId: !Ref Subnet3
This is an example of subnet association, the first one links the subnet number one with the public Route Table and the second association sets the subnet number three with the private Route Table. We do the same for subnets numbers two and four.
Internet Gateway
InternetGateway:
  Type: AWS::EC2::InternetGateway
  Properties:
    Tags:
      - Key: "Name"
        Value: !Join ["-", [!Ref prefix, "ig"]]

VpcIgAttachment:
  Type: AWS::EC2::VPCGatewayAttachment
  Properties:
    InternetGatewayId: !Ref InternetGateway
    VpcId: !Ref VPC

RouteIG:
    Type: AWS::EC2::Route
    Properties:
      RouteTableId: !Ref PublicRT
      DestinationCidrBlock: 0.0.0.0/0
      GatewayId: !Ref InternetGateway
As I explained before, in order to provide Internet connectivity to our subnets, we need to use an Internet Gateway. To achieve that first, we create an Internet Gateway resource, then we attach it to our VPC and finally, we configure the association between our IG and the destination cidr block 0.0.0.0/0 in the public Route Table.
Nat Gateway
ElasticIP:
  Type: AWS::EC2::EIP
  Condition: EnabledNatGateway
  Properties:
    Domain: vpc

NatGateway:
  Type: AWS::EC2::NatGateway
  Condition: EnabledNatGateway
  Properties:
    AllocationId: !GetAtt ElasticIP.AllocationId
    SubnetId: !Ref Subnet1

RouteNatGateway:
  Type: AWS::EC2::Route
  DependsOn: [ NatGateway ]
  Condition: EnabledNatGateway
  Properties:
    DestinationCidrBlock: '0.0.0.0/0'
    NatGatewayId: !Ref NatGateway
    RouteTableId: !Ref PrivateRT
This section is optional and only will be created if it’s set the value true in the createNatGateway parameter. You can see that these resources have the Condition field in its definition assigned with the variable EnabledNatGateway that we defined in the Conditions section of our template.
Maybe you would be asking yourself, why would I need to create a NatGateway? Well, probably you won’t need to create one unless you need to internet connectivity in your private subnets.
But NatGateways are not cheap and keep it 24/7 can increase your bill substantially, so that’s why I decided to give you the option the create it only when you need it and then delete it easily just changing the parameter to false.
There are cheaper options like Nat Instances, but then you have to take care of the instance patching and autoscaling.
To create a NatGateway we need to attach to it an Elastic IP and place it one of our public subnets, in this example Subnet1. Also, we have to add a new route in our Private Route Table that associates our NatGateway with the destination 0.0.0.0/0
Outputs
VPCId:
  Value: !Ref VPC
  Export:
    Name: !Sub "${AWS::StackName}-vpc-id"

Subnet1Id:
  Value: !Ref Subnet1
  Export:
    Name: !Sub "${AWS::StackName}-subnet1-id"

Subnet2Id:
  Value: !Ref Subnet2
  Export:
    Name: !Sub "${AWS::StackName}-subnet2-id"

Subnet3Id:
  Value: !Ref Subnet3
  Export:
    Name: !Sub "${AWS::StackName}-subnet3-id"

Subnet4Id:
  Value: !Ref Subnet4
  Export:
    Name: !Sub "${AWS::StackName}-subnet4-id"

PublicRTId:
  Value: !Ref PublicRT
  Export:
    Name: !Sub "${AWS::StackName}-public-rt-id"

PrivateRTId:
  Value: !Ref PrivateRT
  Export:
    Name: !Sub "${AWS::StackName}-private-rt-id"

DMZSecurityGroup:
  Value: !Ref DMZSecurityGroup
  Export:
    Name: !Sub "${AWS::StackName}-dmz-sg"

DefaultSecurityGroup:
  Value: !GetAtt VPC.DefaultSecurityGroup
  Export:
    Name: !Sub "${AWS::StackName}-default-sg"
Last but not least, we can define some outputs that our template will expose. These outputs can be used by other templates to make references to the resources that we have created.
We need to define a name for each output and for convention we use the stack name of the template as a prefix to avoid name conflicts. To get the stack name we use the Sub Intrinsic Function that substitutes the reference AWS::StackName automatically.
In this example, we’ve configured outputs to expose our Vpc Id, the IDs for our 4 subnets and the Security Group Identifier.
Conclusion
Having a custom VPC in our cloud environment is one of the basic pillars for our AWS infrastructure, in this example, we’ve set up a basic configuration, but you can modify this template to adapt it to your own requirements.
Adding more subnets, setting other IPs and different IP ranges, perhaps having more granular Route Tables or even assigning some ACLs (Access Control List) to our subnets to have an extra layer of security.
Thank you for another informative website. Where else could
I get that type of info written in such a perfect method?
I’ve a project that I am simply now operating on, and I’ve been on the glance out for such information.
Many thanks for your comment and welcome to this exciting world of cloud builders.
My main references basically are the AWS documentation and some A Cloud Guru courses that I bought in Udemy, especially the one to get the Solutions Architect Associate certification.
But stay tuned because soon I will publish a new post to give an example of how to update automatically your ECS containers when you upload a new image to ECR 😉
Long time reader, first time commenter — so, thought I’d drop a comment..
— and at the same time ask for a favor.
Your wordpress site is very simplistic – hope you don’t
mind me asking what theme you’re using? (and don’t mind if I steal it?
:P)
I just launched my small businesses site –also built in wordpress like
yours– but the theme slows (!) the site down quite a
bit.
In case you have a minute, you can find it by searching for “royal cbd” on Google (would appreciate any feedback)
Keep up the good work– and take care of yourself during the coronavirus scare!
~Justin
Hi Justin,
Many thanks for your support, as you can see I’ve also started very recently in the WordPress world so I know how painful can be.
My theme is not a secret, I’m using the twentyseventeen, one of the preinstalled WordPress themes.
I really like be minimalist and I found it very convenient, but I guess any of the pre-installed themes are quite good.
I’ve checked your site and it’s very nice, I like the combination of gold and black. Obviously, your site is more oriented to an online shop so the amount of information and images that you have to show can slow the loading of the site.
If the products and information that you show don’t change very often, I would advise you to use some kind of cache or content delivery network to help with the loading of the static information like images (usually those are the resources that takes more time to load), I know there are some plugins for WordPress that does the trick.
If you are interested in this page explains which options do you have: https://wordpress.org/support/article/optimization-caching/
I wish the best with your business, especially during this time when everything seems to be in standby because of the COVID-19.
Best regards and stay safe,
Javier
Its such as you learn my mind! You appear to know a lot about this, such as
you wrote the guide in it or something. I believe that you just could do with a few p.c.
to power the message home a bit, however instead
of that, that is wonderful blog. An excellent read. I will
definitely be back.
Many thanks for your support, I really appreciate that 🙂
I am not sure where you’re getting your info, but good topic.
I needs to spend some time learning more or understanding more.
Thanks for wonderful info I was looking for this information for my
mission.
Many thanks for the support, it’s all based on my experience with AWS. I know how difficult beginnings are with a new technology, so I hope with these posts I can make it more accessible 🙂
Hey! Do you use Twitter? I’d like to follow you if that would
be ok. I’m absolutely enjoying your blog and look forward
to new posts.
Sure! My twitter is @godof_cloud, you can find the link as well at the bottom of any page (probably I should put it in a more visible place ^^) I hope in the next days publish a new entry, so stay tuned 😉
Pretty nice post. I just stumbled upon your weblog
and wished to say that I’ve truly enjoyed surfing around your blog posts.
After all I’ll be subscribing to your rss feed and I hope you
write again very soon!
Many thanks for your support! I’m glad to hear that you are enjoying the blog, there are still very few posts but I try to add new material every month ^^
What’s Taking place i’m new to this, I stumbled upon this I’ve discovered
It absolutely helpful and it has helped me out loads.
I am hoping to give a contribution & help other customers like its helped me.
Good job.
Many thanks for your kind words, I started this blog to help others in its journey to the Cloud, so I’m really happy to hear that is helping you 🙂
Bonjour ! Très bon post, même si il y aurais quelques petits points à rajouter, celui-ci reste vraiment intéressant.
Thank you for the good writeup. It in fact was a amusement account it.
Look advanced to more added agreeable from you! By the way, how could
we communicate?
Thanks! you can follow me in twitter @godof_cloud (https://twitter.com/godof_cloud)
Do you mind if I quote a few of your articles as long as I provide credit and sources back to your blog?
My blog is in the exact same niche as yours and
my users would definitely benefit from some of the information you present here.
Please let me know if this alright with you. Cheers!
Hi, sure you can quote me in your articles, also if you give me your blog I will have a look at your content, I’m sure I can learn a lot from you as well 😉
Like!! Really appreciate you sharing this blog post.Really thank you! Keep writing.
I am sure this paragraph has touched all the internet
users, its really really pleasant paragraph on building up new
weblog.
Hello to every one, the contents present at this web site
are really awesome for people experience, well, keep up the good work fellows.
Simply want to say your article is as surprising. The clearness for your publish is simply excellent and that
i can suppose you’re a professional in this subject.
Fine along with your permission allow me to
snatch your feed to stay updated with forthcoming post.
Thank you 1,000,000 and please keep up the rewarding work.
Attractive section of content. I just stumbled upon your website and in accession capital to
assert that I get in fact enjoyed account your blog posts.
Anyway I will be subscribing to your augment and even I achievement you
access consistently fast.
I was excited to discover this site. I want to to thank
you for ones time just for this wonderful read!!
I definitely really liked every part of it and i also have you
saved to fav to see new things on your web site.