
Single Page Applications have revolutionized the way we develop web applications, but they come with some challenges that we didn’t have with traditional server-side rendered pages, for example, the way our pages are indexed in search engines like Google or Bing.
It’s very common that for Single Page Applications the Search Engine Robots struggle to be able to get the content of our pages and index the information properly.
One of the solutions that come over and over is server-side rendering. If your framework is completely javascript with a NodeJS server for your API, that could be possible easily using Express, but for Back-Ends developed in Python or Java that probably is not an option.
Also, the beauty of Single Page Applications is that they are rendered at the client-side unloading the backend of that task. If we renounce to that just because the search engines can’t index our application pages properly is like going 5 years back in time.
Luckily, using Cloudfront and Lambda@Edge it’s possible to change dynamically the origin of our application to serve a static version when the request comes specifically from search engine crawlers.
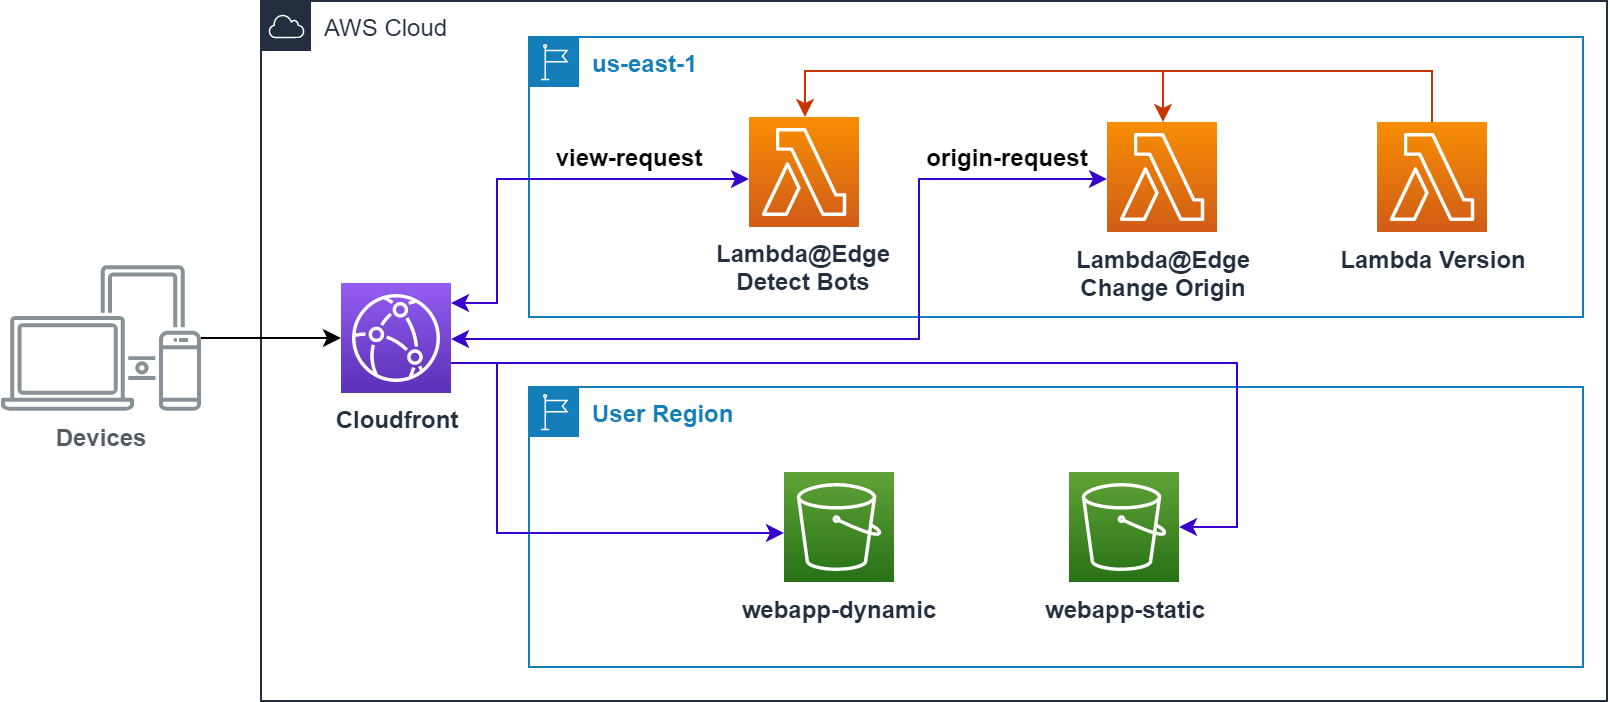
The picture above represents the resources and the workflow that we are going to create for this use case. On one hand, we have a couple of lambda functions that we need to create in the region US East (N. Virginia), that is because only functions created in that region can be attached to Cloudfront as Lambda@Edge.
And on the other hand, we have two S3 buckets, one to store dynamic web application and another to put the static version of the application, you can do it in the way it’s easier for you, for this example I created the pages manually, but for bigger applications, you should probably use some kind of crawler to scan all the site and create the static pages.
The workflow is simple when Cloudfront receives a request, the view-request event calls the Lambda@Edge function that checks the User-Agent header searching for some keywords to identify if the request comes from a regular user or a robot, in case of a robot we will return the request but adding a custom header is-robot with the value true.
Cloudfront receives the new request and launches the origin-request event that will call the Lambda@Edge function that will read our custom header and, if the value is true, will change the origin to use the static bucket.
Repository
As always, you can find all the resources to build this use case in the God of Cloud GitHub repository.
This repository has the following folders:
- artifacts: Contains a JAR file that will be used by the Macro template to create the macro.
- lambda-output-region: Macro Lambda function source code.
- macro: Cloudformation template to create the Macro.
- templates: Cloudformation templates to create application resources.
- templates_us-east-1: Cloudformation templates to create Lambda@Edge functions.
- webapp-dynamic: Angular compiled files to deploy the dynamic application.
- webapp-static: Static version of the dynamic application.
Requirements
To be able to execute the templates properly, I recommend you to create an S3 Bucket (or use one of your existing buckets) and copy in the root path all the content from the God of Cloud GitHub folders except the lambda-output-region.
Templates us-east-1
These templates must be created in the region US East N. Virginia (us-east-1) as I mentioned before, the Lambda functions that are created there can be attached to Cloudfront as Lambda@Edge functions.
To create these resources, change your region to US East (N. Virginia) and in Cloudformation select Create Stack and the option with new resources, and in the next page paste the S3 bucket URL where you have copied the file /templates_us-east-1/master-dynamic-origin.yml
Parameters
prefix:
    Type: String
    Default: dynamic-origin

resourcesBucket:
    Type: String

bucketRegionTarget:
    Type: String
All the templates use the same parameters, just take into account to use the same prefix for all the templates:
- prefix: Our usual parameter to set up a prefix to our resources to avoid conflicts with resources that you already might have, by default is dynamic-origin
- resourcesBucket: The name of the bucket where you have copied the resources from GitHub
- bucketRegionTarget: Region where the bucket that serves the static will be created, for example, us-east-1. If you don’t know what is the short name for your region you can find it out in this link https://docs.aws.amazon.com/AmazonRDS/latest/UserGuide/Concepts.RegionsAndAvailabilityZones.html
DynamicOriginLambdaStack
This Stack will create the Lambda functions to dynamically change the S3 origin based on the User-Agent.
Resources
Lambda Role
DynamicOriginLambdaRole:
  Type: AWS::IAM::Role
  Properties:
    RoleName: !Sub '${prefix}-lambda-role'
    AssumeRolePolicyDocument:
      Statement:
      - Effect: Allow
        Principal:
          Service: [lambda.amazonaws.com, edgelambda.amazonaws.com]
        Action: ['sts:AssumeRole']
    Path: /
    ManagedPolicyArns:
      - "arn:aws:iam::aws:policy/service-role/AWSLambdaBasicExecutionRole"
This is a standard role definition to be assumed by our Lambda functions. Because they are going to be used as Lambda@Edge, it is important to include in the service list the value edgelambda.amazonaws.com
Bot Detector LAMBDA
LambdaBotDetector:
  Type: "AWS::Lambda::Function"
  Properties:
    FunctionName: !Sub '${prefix}-lambda-bot-detector'
    Description: 'Detects if the request is coming from Robots'
    Handler: index.handler
    Role: !GetAtt DynamicOriginLambdaRole.Arn
    Code:
      ZipFile: |
        'use strict';

        const regex = /aolbuild|baidu|bingbot|bingpreview|msnbot|duckduckgo|adsbot-google|googlebot|mediapartners-google|teoma|slurp|yandex|bot|crawl|spider/g;
        exports.handler = (event, context, callback) => {
          console.log('Event: ' + JSON.stringify(event));

          const request = event.Records[0].cf.request;
          const user_agent = request['headers']['user-agent'][0]['value'].toLowerCase();
          if(user_agent !== undefined) {
            const found = user_agent.match(regex);
            request['headers']['is-robot'] = [
              {
                key: 'is-robot',
                value: `${found !== null}`
              }
            ]
          }

          console.log('Request: ' + JSON.stringify(request));
          callback(null, request);
        };
    Runtime: "nodejs10.x"
    Timeout: 5
    MemorySize: 128
    ReservedConcurrentExecutions: 1
This Lambda function is in charge of checking the User-Agent header to find out if the request comes from a Robot/Crawler. To do that we define a regular expression with a bunch of keywords that we have configured to decide if the request has been sent by a Robot.
Then, we check the User-Agent header with our regular expression, and if any of those keywords are contained in the User-Agent header, we add our custom header is-robot.
Change Origin Lambda
LambdaChangeS3Origin:
  Type: "AWS::Lambda::Function"
  Properties:
    FunctionName: !Sub '${prefix}-lambda-change-origin'
    Description: 'Change the origin to get the resources depending on if the request is made by a Robot'
    Handler: "index.handler"
    Role: !GetAtt DynamicOriginLambdaRole.Arn
    Code:
      ZipFile:
        !Sub |
        'use strict';

        exports.handler = (event, context, callback) => {
          console.log('Event: ' + JSON.stringify(event));

          const request = event.Records[0].cf.request;
          let is_robot;
          if ('is-robot' in request['headers']) {
            is_robot = request['headers']['is-robot'][0].value.toLowerCase();
          }

          if (is_robot === 'true') {
            request.origin = {
              s3: {
                authMethod: 'origin-access-identity',
                path: '',
                domainName: '${prefix}-webapp-static-${AWS::AccountId}.s3.${bucketRegionTarget}.amazonaws.com',
                region: '${bucketRegionTarget}',
                customHeaders: {}
              }
            };

            request.headers['host'] = [{key: 'host', value: '${prefix}-webapp-static-${AWS::AccountId}.s3.${bucketRegionTarget}.amazonaws.com'}];
          }

          console.log('Request: ' + JSON.stringify(request));
          callback(null, request);
        };
    Runtime: nodejs10.x
    Timeout: 20
    MemorySize: 128
    ReservedConcurrentExecutions: 1
This is the Lambda function where all the magic happens, here we check if the request has our custom header is-robot, if so we change the origin to point to our static bucket.
This is the code that defines the new origin:
request.origin = {
  s3: {
    authMethod: 'origin-access-identity',
    path: '',
    domainName: '${prefix}-webapp-static-${AWS::AccountId}.s3.${bucketRegionTarget}.amazonaws.com',
    region: '${bucketRegionTarget}',
    customHeaders: {}
  }
};
I just want to mention a few things from this snippet that might be important, the authMethod for S3 origins is always origin-access-identity and the value of the domainName parameter is the target S3 Bucket regional domain name, that includes the region.
This is important because if you don’t include the region in your domain name you could get the following error message when you try to visualize your static site:
The authorization header is malformed; the region 'eu-central-1' is wrong; expecting 'us-east-1'
Also, you need to update the host header with the new bucket domain, as we do in this line:
request.headers['host'] = [{key: 'host', value: '${prefix}-webapp-static-${AWS::AccountId}.s3.${bucketRegionTarget}.amazonaws.com'}];
Publish Version Lambda
PublishLambdaVersionRole:
  Type: AWS::IAM::Role
  Properties:
    RoleName: !Sub '${prefix}-publish-lambda-version-role'
    AssumeRolePolicyDocument:
      Version: '2012-10-17'
      Statement:
      - Effect: Allow
        Principal:
          Service: lambda.amazonaws.com
        Action: sts:AssumeRole
    ManagedPolicyArns:
      - arn:aws:iam::aws:policy/service-role/AWSLambdaBasicExecutionRole
    Policies:
      - PolicyName: !Sub '${prefix}-publish-lambda-version-policy'
        PolicyDocument:
          Version: '2012-10-17'
          Statement:
          - Effect: Allow
            Action: lambda:PublishVersion
            Resource:
              - !GetAtt LambdaBotDetector.Arn
              - !GetAtt LambdaChangeS3Origin.Arn

PublishLambdaVersion:
  Type: AWS::Lambda::Function
  Properties:
    FunctionName: !Sub '${prefix}-publish-lambda-version'
    Handler: index.handler
    Runtime: nodejs12.x
    Role: !GetAtt PublishLambdaVersionRole.Arn
    Code:
      ZipFile: |
        const AWS = require('aws-sdk')
        const response = require('cfn-response')
        const lambda = new AWS.Lambda()

        exports.handler = (event, context) => {

          if (event.RequestType == 'Delete') {
            return response.send(event, context, response.SUCCESS);
          }

          console.log(event.ResourceProperties.FunctionName);

          lambda.publishVersion({FunctionName: event.ResourceProperties.FunctionName}, (err, data) => {
            console.log("Lambda Publish Version Response");
            if(err) {
              response.send(event, context, response.FAILED, err);
            } else {
              response.send(event, context, response.SUCCESS, data);
            }
          });
        }
To use a Lamda function in Cloudfront we have to create a version, Cloudformation does not give us a specific resource to do that, so we have to create our own way using custom resources
This Lambda function will version the Lambda functions that we have created before, but in order to be able to publish a new version, we have to create a role to allow lambda:PublishVersion permission, in this case, I’ve specified the ARNs of the two Lambda functions to don’t make it too generic.
The data object returns a lot of information, but we have a special interest in the property FunctionArn, which will contain the Lambda function ARN with the version that we just created.
You can check the details of the NodeJS publishVersion function in the API documentation https://docs.aws.amazon.com/AWSJavaScriptSDK/latest/AWS/Lambda.html#publishVersion-property
LambdaBotDetectorVersion:
  Type: Custom::LatestLambdaVersion
  Properties:
    ServiceToken: !GetAtt PublishLambdaVersion.Arn
    FunctionName: !Ref LambdaBotDetector
The previous block configures a custom resource, if you haven’t used custom resources before is a way to implement handmade logic that is not available through the standard Cloudformation resources. The ServiceToken property is mandatory and specifies the Lambda function ARN that the custom resource is going to invoke, the FunctionName property is defined by us and contains the Lambda name that we want to publish a new version.
If you want to know more about custom resources, you can have a look at the AWS documentation https://docs.aws.amazon.com/AWSCloudFormation/latest/UserGuide/template-custom-resources.html
LAmbda Permissions
LambdaDetectBotsPermission:
  Type: AWS::Lambda::Permission
  Properties:
    Action: lambda:InvokeFunction
    FunctionName: !Ref lambdaBotDetectorFunctionArn
    Principal: 'cloudfront.amazonaws.com'
    SourceArn: !Sub 'arn:aws:cloudfront::${AWS::AccountId}:distribution/*'
Finally, we create permissions to allow Cloudfront to invoke the Lambda@Edge functions.
Outputs
LambdaBotDetectorFunctionArn:
  Description: Lambda function to change the origin Function ARN
  Value: !GetAtt LambdaBotDetectorVersion.FunctionArn
  Export:
    Name: 'lambda-bot-detector-function-arn'

LambdaChangeS3OriginFunctionArn:
  Description: Lambda function to change the origin Function ARN
  Value: !GetAtt LambdaChangeS3OriginVersion.FunctionArn
  Export:
    Name: 'lambda-change-origin-function-arn'
Usually, I don’t mention too much the outputs section but in this case, I think it’s important to highlight a couple of things.
First, to get the Lambda function ARN with the version we use the GetAtt intrinsic function with the custom resource and the attribute FunctionArn, the property we mentioned before that is part of the data response.
And second, we export this output with a specific name to make it available using any of the available APIs that AWS provides.
Macro Template
Cloudformation doesn’t provide any intrinsic function to be able to get stack outputs from templates created in other regions, so in order to get the ARN identifier with the version for the Lambda functions that we just created in our previous template easily, I have developed a Cloudformation Macro that does that for us.
Create a Macro simplify the template creation, otherwise we should add parameters for the Lambda ARNs and get the value from the outputs
If you haven’t used macros before, in my previous post Orchestrates Stacks with Cloudformation I have a section where I explain a little bit how they work.
To make it simple this resource should be created in the same region where you plan to build the application template, so go to Cloudformation, change to your preferred region, select Create Stack and the option with new resources, and in the next page paste the S3 bucket URL where you have copied the file /macro/macro-get-output-region.yml
Declaration
Fn::Transform:
  Name: GetOutputRegion
  Parameters:
    TargetRegion: String
    ParentProperty: String
    PropertyName: String
    OutputNames: [String, ...]
To use the macro, we have to include the previous block at the same level as the property we want to get the value, for instance:
LambdaFunctionAssociations:
   EventType: viewer-request
   Fn::Transform:
      Name: "GetOutputRegion"
      Parameters:
         TargetRegion: 'us-east-1'
         PropertyName: LambdaFunctionARN
         OutputNames: lambda-bot-detector-function-arn
In case of a list of elements, we need to put the macro at the same level as the parent property, for instance:
LambdaFunctionAssociations:
  - EventType: viewer-request
  - EventType: origin-request
Fn::Transform:
  Name: "GetOutputRegion"
  Parameters:
    TargetRegion: 'us-east-1'
    ParentProperty: LambdaFunctionAssociations
    PropertyName: LambdaFunctionARN
    OutputNames:
      - lambda-bot-detector-function-arn
      - lambda-change-origin-function-arn
The macro needs the following parameters:
- TargetRegion: Region where we want to get the output
- ParentProperty: This parameter is only mandatory when we want to use the macro in a list of elements and specify the parent property that contains the list of values (like in the second example).
- PropertyName: Property that we want to add with the value of the output
- OutputNames: This is a list of output names that will be retrieved, we can provide a list in case we have a list of elements and the properties will be processed in order
Resources
Macro Lambda Role
LambdaGetOutputRegionRole:
  Type: AWS::IAM::Role
  Properties:
    RoleName: !Sub '${prefix}-lambda-get-output-region-role'
    AssumeRolePolicyDocument:
      Statement:
      - Effect: Allow
        Principal:
          Service: [lambda.amazonaws.com]
        Action: ['sts:AssumeRole']
    Path: /
    ManagedPolicyArns:
      - "arn:aws:iam::aws:policy/service-role/AWSLambdaVPCAccessExecutionRole"
    Policies:
    - PolicyName: !Sub '${prefix}-lambda-get-output-region-policy'
      PolicyDocument:
        Statement:
        - Effect: Allow
          Action:
            - cloudformation:ListExports
          Resource: '*'
This Lambda role definition is pretty standard, but because our lambda function will need to be able to have access at the Cloudformation list of exports, we have to make sure that our Lambda function has the permission cloudformation:ListExports attached.
Macro Lambda
LambdaGetOutputRegion:
  Type: AWS::Lambda::Function
  DependsOn: [ LambdaGetOutputRegionRole ]
  Properties:
    FunctionName: 'lambda-get-output-region'
    Description: Lambda function gets an output from cloudformation stacks in other regions
    Handler: cloud.godof.lambda.output.region.Handler
    Role: !GetAtt LambdaGetOutputRegionRole.Arn
    Code:
      S3Bucket: !Ref resourcesBucket
      S3Key: 'artifacts/lambda-output-region.jar'
    Runtime: "java8"
    Timeout: 60
    MemorySize: 512
    ReservedConcurrentExecutions: 1
In this section, we create the lambda function that will be used by our macro, just highlight that I’m assuming that the JAR file for our function is located under the artifacts folder in the root S3 Bucket path.
I’ve used Java to create the macro because allows me to specify the target region when I create the client, that’s not the case for other languages, which takes the region where the lambda function is being executed.
Macro
MacroGetOutputRegion:
    Type: AWS::CloudFormation::Macro
    DependsOn: [ LambdaGetOutputRegion ]
    Properties:
      Name: 'GetOutputRegion'
      Description: "Get the output value from other regions"
      FunctionName: !Ref LambdaGetOutputRegion
Finally, to be able to use our macro we create the resource, specifying the Lambda function that will perform all the logic.
Templates
The templates folder that you copied contains the Cloudformation templates to create the S3 Buckets that host the dynamic and static web application and the Cloudfront distribution that will serve the content depending if the request comes from a regular user or a robot.
To create these resources, go to Cloudformation, change to your preferred region, select Create Stack and the option with new resources, and in the next page paste the S3 bucket URL where you have copied the file /templates/master-dynamic-origin-app.yml
Resources
Origin Access IDentity
CDNOriginAccessIdentity:
  Type: AWS::CloudFront::CloudFrontOriginAccessIdentity
  Properties:
    CloudFrontOriginAccessIdentityConfig:
      Comment: 'CloudFront OAI for Bucket Origins'
This template has a resource to create the Origin Access Identity, this resource will be used by Cloudfront and the Bucket policies later.
S3Stack
This stack will create the two S3 buckets that we will need to host our dynamic and static applications. Both buckets are created in the same way so I will explain only the dynamic bucket.
Resources
S3 Buckets
WebappDynamicBucket:
  Type: AWS::S3::Bucket
  Properties:
    BucketName: !Sub 'webapp-dynamic-${AWS::AccountId}'
    AccessControl: PublicRead
    WebsiteConfiguration:
      IndexDocument: index.html
      ErrorDocument: index.html
    Tags:
    - Key: Name
      Value: !Sub 'webapp-dynamic-${AWS::AccountId}'

WebappDynamicBucketPolicy:
  Type: AWS::S3::BucketPolicy
  Properties:
    Bucket: !Ref WebappDynamicBucket
    PolicyDocument:
      Id: WebappDynamicBucketPolicy
      Version: 2012-10-17
      Statement:
        - Effect: Allow
          Principal:
            CanonicalUser: !Ref oaiCanonicalUserId
          Action: 's3:GetObject'
          Resource: !Sub 'arn:aws:s3:::${WebappDynamicBucket}/*'
S3 Buckets can be used to work as a web server for static content, which makes them ideal to host Single Page Applications.
For Single Page Application hosted in S3 the index and the error page must be pointing to the index.html page
We accomplish that with the property WebsiteConfiguration, where we have to define the index page and the error page, however, because in SPAs the page doesn’t really exist the page but is the javascript router who reads the URL and dynamically builds the page we have to point the error page again to the index.html.
Also, it’s important to make our bucket public, so this way Cloudfront won’t have any problem accessing the content. Don’t worry too much about security because we will restrict the access only to Cloudfront using a Bucket Policy.
The next thing to do is create a Bucket Policy to allow access to the Origin Access Identity that we have created before in order to grant access to our bucket only through Cloudfront.
CloudfrontStack
Cloudfront
CloudFront:
  Type: AWS::CloudFront::Distribution
  Properties:
    DistributionConfig:
      Comment: 'dynamic webapp distribution'
      PriceClass: PriceClass_All
      Enabled: true
      HttpVersion: 'http2'
      Origins:
        - Id: DynamicS3Origin
          DomainName: !Ref dynamicBucketDomain
          S3OriginConfig:
            OriginAccessIdentity: !Sub 'origin-access-identity/cloudfront/${oaiReference}'
      DefaultRootObject: index.html
      DefaultCacheBehavior:
        ViewerProtocolPolicy: redirect-to-https
        AllowedMethods:
          - GET
          - HEAD
          - OPTIONS
        CachedMethods:
          - GET
          - HEAD
          - OPTIONS
        Compress: true
        TargetOriginId: DynamicS3Origin
        ForwardedValues:
          QueryString: true
          Cookies:
            Forward: none
          Headers:
            - is-robot
        LambdaFunctionAssociations:
          - EventType: viewer-request
          - EventType: origin-request
        Fn::Transform:
          Name: "GetOutputRegion"
          Parameters:
            TargetRegion: 'us-east-1'
            ParentProperty: LambdaFunctionAssociations
            PropertyName: LambdaFunctionARN
            OutputNames:
              - lambda-bot-detector-function-arn
              - lambda-change-origin-function-arn
      CustomErrorResponses:
      - ErrorCode: 403
        ResponseCode: 200
        ResponsePagePath: "/index.html"
      - ErrorCode: 404
        ResponseCode: 200
        ResponsePagePath: "/index.html"
When you see the resorce to create a Cloudfront distribution for the first time it can be a little bit overwhelming but don’t panic, we will go through it step by step.
Cloudfront, in a nutshell, is the Content Delivery Network (CDN) from AWS that takes advantage of the AWS Edge Locations to serve the content very quickly in any region, that is because caches the information, so if people from the same area ask for the same information, the request doesn’t need to go all the way through our backend, the response can come directly from the nearest edge location that has cached the data.
When you create a Cloudfront distribution one of the things you have to choose is the Price Class, this is to define which regions are going to use our CDN. AWS gives you three options:
- PriceClass_100: Only US, Canada, and Europe
- PriceClass_200: US, Canada, Europe, Asia, Middle East, Africa
- PriceClass_All: All Edge Locations
Personally I always choose all the edge locations, because it gives you the best performance and it is really cheap.
Next, we configure the Origin where Cloudfront is going to serve the content. In our case, the origin is an S3 bucket, so we have to configure the S3OriginConfig with the Origin Access Identity reference.
Cloudfront can be configured with origins outside AWS, so you can benefit from the Edge Locations
We define the DefaultRootObject property with our index.html page because is going to be the entry point of our application.
In the DefaultCacheBehavior property, we configure how is going to behave the Cloudfront cache.
First, we set up the allowed method for our distribution, because the application only reads information with GET, HEAD, and OPTIONS is more than enough, but if your application also stores, update or delete information perhaps you might configure also POST, PUT, PATCH and DELETE.
Secondly, we configure the methods that will be cached by Cloudfront, so I’m afraid at the moment to write this post only GET, HEAD, and OPTIONS methods can be cache, so if your application sends requests using POST those responses won’t be cached.
Then, we configure which elements might be forwarded by the distribution, so in our case, we want to forward query strings, no cookies and we whitelist our custom header is-robot.
Functions associated with viewer-request events must have 5 seconds of timeout and for origin-request events 30 seconds maximum.
Finally, we configure the Lambda@Edge functions ARNs with the version that will be triggered by the event types viewer-request and origin request, as you can see I’m using the macro we have created before to get the values from outputs in the us-east-1 region.
You can check these values if you change your current region to US East (North Virginia) click over the DynamicOriginLambdaStack and select the Outputs tab in the right section.
To finish the configuration of our Cloudfront, we map some error responses to 200 responses returning to the index.html, this is something similar to what we did when we configured the S3 Bucket as Web Server, because our applications is a SPA, Cloudfront will try to find the page based on the route of our application but it won’t find anything, so in those cases, we want to reroute to the index.html to build the page.
Testing the application
Once all the stacks are successfully created, we can test if everything works as expected, to do that first we have to copy the content of the webapp-dynamic folder from GitHub into the webapp-dynamic-[AccountId] Bucket, but for the static website, it’s a little bit more tricky.
For SPAs usually, the URL doesn’t have any extension .html, so if we copy directly the files into S3, they will be tagged with the Content-Type binary/octet-stream, but we want to assign the Content-Type text/html and the best way to do it is to upload the files using the AWS CLI.
If you don’t have the AWS CLI installed in your computer, have a look at this guide from AWS to install and configure the CLI https://docs.aws.amazon.com/cli/latest/userguide/install-cliv2.html
To upload the files with the right Content-Type you need to use this command, replacing the parameters between brackets for the values that you have used during the creation of the templates:
aws s3 sync s3://[resourcesBucket]/webapp-static s3://[prefix]-webapp-static-[AccountId] --content-type text/html --metadata-directive REPLACE
The parameter metada-directive specifies whether the metadata is copied from the source object or replaced with metadata provided when copying S3 objects
AWS
Now, we have to go to the Cloudfront section, and look for the distribution that has the comment “dynamic webapp distribution“, then we copy the value inside the DomainName column.

Pasted the text that you just copied in any browser, and you should see the web application that I developed for this demo.

To test if our application shows the static version when it receives a request form a Robot/Crawler, we need to be able to change the User-Agent header, the easiest way is to install the User-Agent Switcher extension for Chrome.
Once you have it installed you should see an icon of a paper with a mask in the top right section ![]() of your browser. To configure the extension, do right-click over the icon and select Options.
of your browser. To configure the extension, do right-click over the icon and select Options.
A new tab will open with a long list of user agents, but the google bot option is not in there, so we have to create it ourselves.
To do that, enter the information below in the input fields and press add.

Now, you just need to go to the tab where the application is loaded, left-click over the extension icon, select Chrome and then GoogleBot. The page should reload and you should see the same page but without any styles.
Conclusion
I really hope that Search Engines could make their robots more SPA friendly without forcing us to use server-side rendering or boilerplate architectures like I described before, so we can focus on what really is important for our user that is creating value for their applications.
Acknowledgments
As a Solution Architect and Web developer before, the Internet is a source of knowledge that you can use when you feel stuck with something and my case is not different, so I would like to thank wjordan from Stackoverflow who gave the solution to create the lambda version with Cloudformation and Donkersgoed for its great article Separating Search Engine Crawler Traffic with Lambda@Edge